
There are a few different areas where a check can be voided. This article explains how to correctly void a check from each area in the software and explains how the void will impact the general ledger.
When a check is voided in Evosus it will be reflected in the Bank Register and may have an effect on the
General Ledger, depending upon whether the check has already posted. If the check has posted to the General Ledger, the original postings is reversed to account for the voided check. If the check has not posted to the General Ledger, the check is canceled and nothing will post to the General Ledger.
-
There are several places where you can void a check. Each place is listed below along with specific instructions for how to void the check.
-
The Bank Register will display the original entry which reduced the bank account balance and a separate entry showing the voided check increasing the bank balance. This makes it easy to keep track of used check numbers. The status of the check will change so that it displays VOID along with the date the check was voided.
Voiding a Check from the Print Checks Queue
To void a check through the Print Checks queue, go to Administration > Accounting > Banking or Accounts Payable > Print Checks. There are two ways to void checks in the Print Checks queue depending on whether or not the check has been printed:
Option 1: Void a Check that has NOT Printed
-
Select the check you wish to void.
-
Click Void Check at the bottom of the screen.
-
Confirm you would like to Void the check by clicking Yes.
-
If the check has posted a message will appear asking if you would like to continue. Click Yes.
-
Enter the reason for voiding the check. The Void Check reason will appear on the general ledger.
-
Click OK. You have successfully voided the check.
Option 2: Void a Check that has Printed
-
Click Print History at the bottom of the screen.
-
Select the check you wish to void. If you know the number of the check you can enter the number in the Search by the Check Number field and click Search.
-
Click Void Check.
-
Confirm you would like to void the check by clicking Yes.
-
A message will appear stating the check has printed. Click Yes to confirm you would like to void the check.
-
If the check has posted a message will appear asking if you would like to continue. Click Yes.
-
Enter the reason for voiding the check. The Void Check reason will appear on the general ledger.
-
Click OK. You have successfully voided the Check.
How to Void a Check Created in a Different Accounting Period
This is an optional process if you need to void a check but do not want to reopen the accounting period in which the check was written and/or redo your financial reports. In this scenario, the Write Checks Process with PrePay Option was checked and as such, the transaction will post a credit to the bank and a debit to AP, while creating a debit memo for the amount of the check.

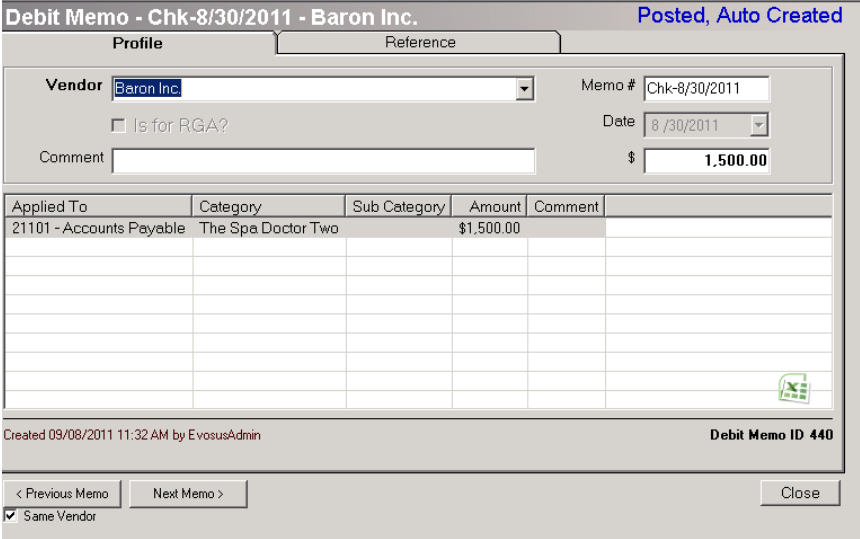
Notice that there is no reference to the PrePay Debit Memo in the posting activity.
Since the check posts directly to AP, Evosus assumes that the creation of the invoice will take care of the expense portion of the transaction which is why you see the posting activity going directly to AP.
Because of the auto-created debit memo, we suggest that you do the following process to clear the debit memo and manually void the check at the same time. See the steps referenced below.
How to Clear the Debit Memo and Manually Void the Check at the Same Time
- Go to Administration > Accounting > Accounts Payable > Enter Bill and create a fake invoice.
-
Create a dummy invoice to the vendor in the same amount as the debit memo. Be sure to enter a memo regarding why you are creating the dummy invoice for future reference.
-
On the accounts tab, enter the same bank GL account that the check was drawn against.
-
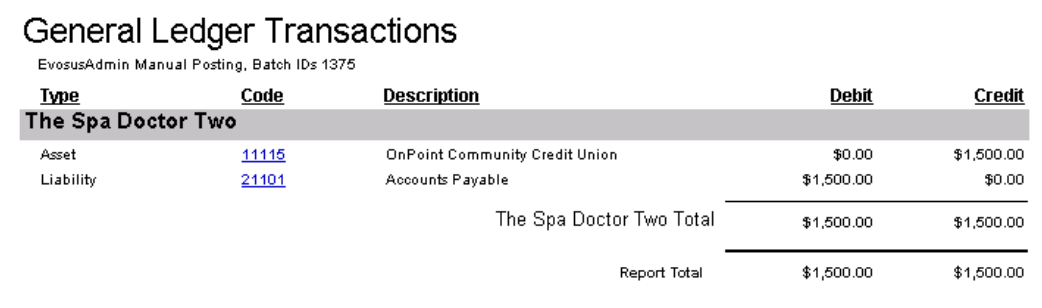
When the invoice is posted, it will post as a debit to the bank and credit to AP as shown below.


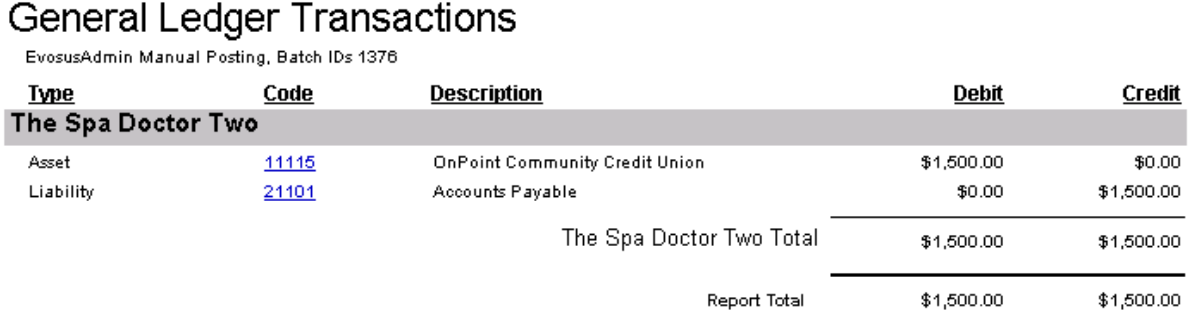
The next step is to go to Pay Bills and pay the invoice with the debit memo to clear the debit memo to a $0 balance. The posting shown above cleared accounts payable and the payment of the invoice using the debit memo clears it off the AP Aging report.
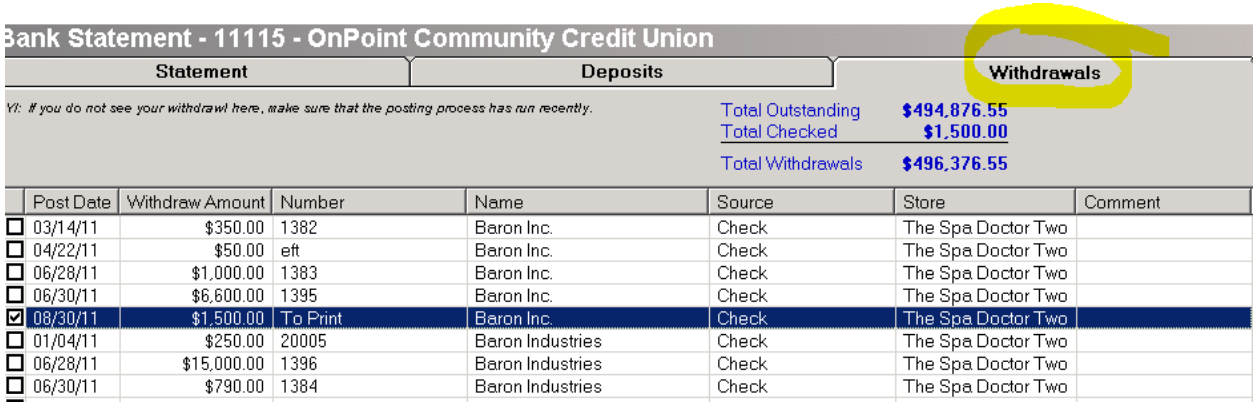
3. Clearing the checks from the Bank ReconciliationThe final step is to go to the Bank Reconciliation and mark as cleared the original check you wanted to void on the withdrawal If the check that you want to void is not associated to a PrePay Debit memo, then we suggest that you create a general journal entry in which you will credit the original expense GL account used on the check, and debit the bank GL account upon which the check was written. Once these transactions have been posted, you will check them both off the bank reconciliation as shown in the example below. This will clear the o/s check without reopening the associated account period or having to reissue your financial reports. side and the AP Invoice on the deposit side. This will clear the O/S check without having to actually VOID it.
Vendor Profile Void
To void a check through the Vendor Profile, go to Administration > Accounting > Accounts Payable > Search Vendors.
-
Locate and select vendor from Vendor Search results.
-
Select Payments from the left vertical menu.
-
Highlight the check you want to void.
-
Click the Options button at the top of the screen.
-
Select Cancel Payment.
-
Confirm that you want to void the check by clicking Yes.
-
If the check has been printed, a message will appear asking if you would like to continue. Click Yes to continue.
-
If the check has posted a message will appear asking if you would like to continue. Click Yes.
-
Enter the reason for voiding the check. The Void Check reason will appear next to the check in the Payments Tab of the Vendor Profile and will display on the general ledger.
-
Click OK. You have successfully voided the check.
To void a check through Search Checks, go to Administration > Accounting > Banking > Search Checks.
-
Locate the check you wish to void using the search filters at the top of the screen.
-
Highlight the check and click Void.
-
Confirm that you want to void the check by clicking Yes.
-
If the check has been printed, a message will appear asking if you would like to continue. Click Yes to continue.
-
If the check has posted a message will appear asking if you would like to continue. Click Yes.
-
Enter the reason for voiding the check. The Void Check reason will display on the general ledger.
-
Click OK. You have successfully voided the check.
How to Locate a Voided Check
There are multiple ways to locate a voided check.
-
Go to Administration > Accounting > Banking > Search Checks. Select the Voided radio button at the top of the screen, then use the other filters to locate the check in question. You can search by bank account, amount, text (to search by payee, reference number, memo or check number) or date range.
-
Go to the Vendor Profile > Payments Tab. All checks for the selected vendor will be listed. Use the date filters to search by quarter or year. You can also use the text search field to locate the check by check number, payee or other text. Note: This option is only available if the check was written to a vendor.
-
Go to Administration > Accounting > Banking > Bank Register. Use the Find
 icon on the header of the print screen to search for a specific check number, amount, date or description.
 -
Go to Administration > Accounting > Banking > Write Checks. Use the Previous and Next Buttons to scroll through checks. Check the "Same Payee" or "Same Bank" boxes to filter your search.
| Category |
Function |
| Admin-Accounting |
*Can Access Accounting Tree Branch |
| BANK – Print Checks |
Related Reports
- Bank Register (Administration > Reports > Accounting > Banking > Bank Register): View all Transactions affecting a bank account and whether or not they have cleared.