
When creating a new store, you can only add one cash drawer to the store. Once the store is created, use the Cash Drawers tab to add additional cash drawers.
Add a Cash Drawer:
-
Open the Stores tab of the Administration-System screen (Administration > System > Stores > Stores).
-
Double click on a store.
-
Open the Cash Drawers tab.
-
Click Add.
-
Cash Drawer Name: Enter the name of the new cash drawer
-
Allow Petty Cash Transactions - Check this box if this cash drawer can be used for petty cash transactions. Some stores use a separate cash drawer for petty cash while others allow any POS cash drawer to be used for petty cash.

- Auto Open this Cash Drawer with Zero Cash: When this box is checked, the cash drawer automatically opens with zero dollars when the first payment is made to that drawer. This is helpful for companies that use separate cash drawers for back office use such as Accounts Receivable and Service. These drawers generally open with zero cash because the cash and checks are deposited every night.
- Do not select this option on cash drawers that actually hold cash. For example, a point of sale register.

-
Recommended Cash Balance: This is the amount that should be left in the drawer at the end of the day and the amount used to open at the beginning of the day.
-
GL Cash On Hand: Select a GL account for the cash drawer
-
All payments received in the application are assigned a store and cash drawer.
-
Cash drawers are assigned an asset account. Payments are posted to this account until the funds are deposited in the bank.
-
Click Add Acct to create a new GL account.
-
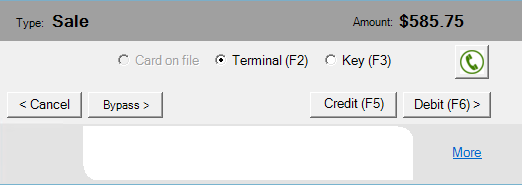
Default Card Entry Mode: Select how credit cards are entered by default when using this cash drawer. For example, select Terminal if a card reader terminal is attached to the cash drawer, or select Keyed if the cash drawer is a back office workstation that is not attached to a cash drawer.
-
The selection in this field determines by default which option is selected on the Process Credit Card screen. This screen appears if you are using Evosus Card Services, and you process a credit card payment using POS.
-
Has Pole Display: Check this box if the cash register has a pole display, and then select a COM port from the drop-down menu.
-
Click OK to create the cash drawer.