
A kit is a group of items that are sold together.
There are two kinds of kits:
- Dynamic: Dynamic kits are a great sales tool, and ideal for selling groups of items with many options, for example, pool, spas or stoves. Dynamic kits are a list of questions that ensure the sales staff asks the right questions, offers the correct accessories and options, and completes the order. For example, if you sell a spa (model X) that comes in different colors, the questions might be: What color of Model X Spa do you want? What color of cover do you want?
- Static: The items in a static kit never change. For example, if you sell an item as individual units and as a case, you can set up the inventory item to use Each as the units of measure(Inventory > Open an item > Profile tab > Sell Unit of Measure field), and then create a static kit of the inventory item with a quantity of 12 to sell a case. Static kits can also be used in dynamic kits.
Add Dynamic Kit:
Step 1: Create a kit category
- Before you can create a kit, the kit category and sub-category must be set up in the inventory tree. Go to Administration > Inventory > General Setup > Kit Categories.
Step 2: Create the kit
- Open the New Kit screen (Administration > Inventory > Search Kits > Add button).
- Kit Code: This code should reflect the main item in the kit, not necessarily the color or other options that might come with it.
- Description: Enter a brief description of the kit.
- Kit Type: Select Dynamic.
a. Static Kits are also available if you know exactly what items are going in the kit and they will never change.
-
Category: Select the kit category, for example, Spa Kits, Stove Kits, Pool Kits, or Filter Kits.
a. See Kit Categories for detailed information about creating kit categories (Administration > Inventory > General Setup > Kit Categories).
-
Sub-Category: Select a sub-category, for example, Model X, Model Y, or Model Z. When you create a kit category, you also set up the sub-categories.
-
Barcode ID: Enter a barcode, if one exists for this kit. If you enter a barcode, you will then be able to scan the kit onto an order.
-
Sell this Kit by Itself: Check this box if the kit should be available to sell. If this box is not checked, the kit can only be added to other kits.
-
Click Save and Add Items. The Permanent Items tab appears.
Step 3: (optional)Add permanent items to the kit
If there are items that will come with the kit no matter what options the customer chooses, they would be considered permanent kit items and would be added here. Items such as GFCIs for spas are often included with the spa no matter what, so the customer would not be able to choose whether or not they wanted one. For stoves, permanent kit items might include storm collars or certain lengths of pipe you always need with the installation of a wood or pellet stove.
-
Open the Permanent Items tab.
-
Click Add. The Kit Item screen appears.
a. Copy: Click Copy to copy the permanent kit items from an existing kit. This can save time and reduce data entry.
-
Item Code - Select the item.
-
Quantity - Enter the quantity you wish to include in the kit.
-
Kit Item Pricing Option - Select a pricing option for this item.
a. Retail Price: Adds the item onto the order at full retail price. Click Check Retail Price to see the current retail price.
b. Retail Minus Percent: Adds the item onto the order discounted to a specified percentage. The amount off would then be reflected in both the Extended and Discounted amount that prints on a Sales or Service Order. (These amounts reflect the total discounts taken off items using the Pricing Option entered when creating the kit as well as any manual discounts taken at the time of sale).
c. Fixed price: Adds the item onto the order at a fixed amount.
d. No Charge: Adds the item onto the order at no charge to the customer.
-
Click Save and Add to add another permanent kit item, or click OK if you are done adding permanent kits items.
Step 4: Add dynamic items to the kit
Use the Dynamic Tab to begin building the questions and answers within your kit.
-
Click "Add New Question" to add a question to the kit.
-
A screen will appear asking if...
a. This question requires an answer. If the question must be answered in order to create the kit, then this box must be checked. The spa color or installer would be an example of a required answer.
b. This question allows multiple selections. If there is more than one option the customer can choose, such as an Ozonator and/or Steps (and they may choose both if desired), then the question should allow the selection of multiple items.
c. This question allows quantity change for the selected item. If the customer has the option to purchase more than one of the item listed (such as they want 3 bags of fuel instead of 1) then checking this box will allow for the quantity to be changed from within the kit.
-
Enter the question into the field provided. Special notes to the employee can also be added after the initial question, such as "Do Not Use an Ozonator with a non-chlorine product sanitizer."
-
Click [Save and Add] to add the next question or click [OK] if you are done adding questions.
-
Once you are done adding questions, you can begin adding answers. (You may also add answers as you create questions).
-
Click "Add New Answer Option" to add Answers (Inventory Items).
-
Type in or search for the item you are adding. You may also select a static kit from the pull-down menu. For example, ou may want to add a static kit as an answer to a question
-
Select the quantity you wish to add.
-
Select a Pricing Option (refer to above definitions of pricing options).
-
Click Save and Add to add more answers or click OK if you are done adding answers to this question.
a. If you have already created a kit for a similar item model, click [Copy Questions from Kit] to: select a kit to copy, or select to copy Questions only, Answer Only, Permanent Items only or a combination of the three.
b. By copying questions from other kits onto the order, you will save a lot of time and energy. You can then adjust the kit as needed to perfectly match the model you are currently working with.
c. Once you have added all your questions and answers, you may click [Change Order of Questions] and move question up or down using the buttons marked [Move Up] and [Move Down]. This will change the order in which they are displayed when an employee is using a dynamic kit.
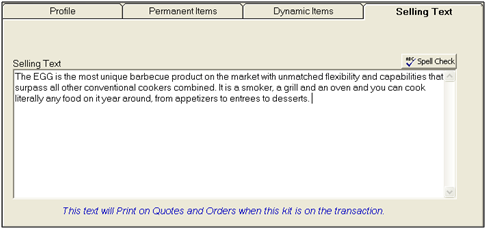
Step 5: Add selling text
The last tab is used to enter selling text that prints on the customer's Quote or Order. Selling Text is specific for each kit and is used to specify the added benefits and features. You may want to specifically point out what this Kit (or Model) comes with and what special features it might have.
-
Once you are completely done adding questions and answers, click OK.
Before you can start selling the kit, you need to Update the kit and change the status of the kit from In Development to In Production. You can do this by going selecting the kit and clicking Update. On the Profile Tab, click Change Status and the status will change to In Production.