
Create a sales promotion to set the pricing of one or more items for a specific period of time. The discount will automatically be taken off the order during the promotion time frame. The promotion selling price will automatically be used unless the item is in a kit (the kit pricing overrides an individual item discount price) or if the customer has a Customer-Specific Price (if a sales promotion and customer specific pricing is available, the lowest price will be used). Sales promotions can also be defined for one or more stores.
Add A New Sales Promotion:
- Open the Sales Promotion screen (Administration > Sales > Sales Promotions > Add Sales Promotion).
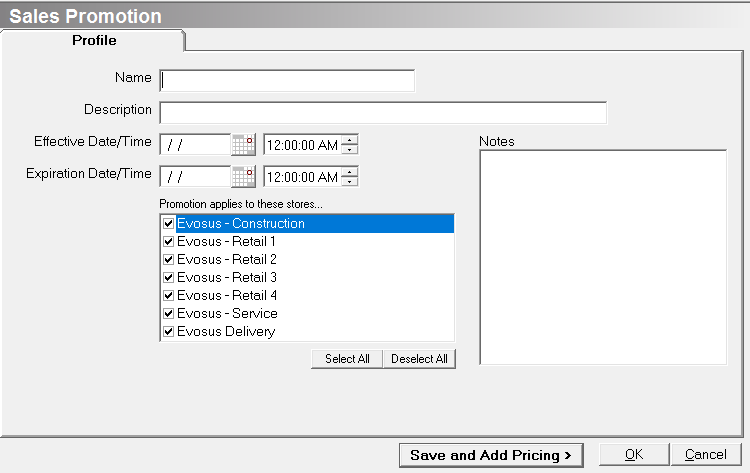
- Input the Name of the sales promotion, for example, Spring Sale 2019.
- Input the Description of the sales promotion.
- Select the Effective Date from the calendar or type in a date. This is the date the promotion will actually begin. On this date, Evosus® will automatically discount items included in the Sales Promotion.
- Select the Effective Time. This is the time of day the promotion will actually begin. The discount will not be taken by Evosus® until the exact time specified.
- Select the Expiration Date from the calendar or type in a date. This is the date the promotion will end. On this date, Evosus® will automatically stop discounting items included in the Sales Promotion.
- Select the Expiration Time. This is the time of day the promotion will actually end. The discount will discontinue at the time specified.
- Check off the store(s) the Sales Promotion applies too. If a store is not selected, the discount will not be seen when logged into that store and discounts will not be taken off orders.
- Enter any notes specific to the Sales Promotion. These notes will not be viewable from anywhere but the Sales Promotion screen.
- Click 'Save and Add Pricing'.

- Discounts can be taken off specific Inventory Items, Product Line Sub Departments or entire Product Lines:
- Inventory Item: Select an inventory by entering a part number or browse inventory and select the item you wish to discount. Proceed to Step 10.
- Product Line Sub-Department: Select a specific sub-department from a product line. Click the [+] to browse through Product Lines. Highlight the Sub Department you wish to discount and click Select. Check the "Cascade to Sub-Departments" box if you would like the discount to apply to any Sub Departments below the selected Sub Department.
- Product Line: Select a Product Line from the pull-down menu. Selecting a Product Line discounts every item in the Product Line including any items in Sub Departments.
- Select a Pricing Method to create the discount for the above-selected items:
- Fixed price: Enter the fixed amount you want to charge for the selected items. When an item is added to an order Evosus® will charge a flat discount amount for the item.
- Cash Off: Enter the dollar amount you would like discounted for the selected items. For example, if $5.00 is entered, Evosus® will discount $5.00 from each item selected.
- Percent markdown: Enter the percent to discount whenever this item is added to an order.
- Percent mark up: Enter the percent to mark the item up by whenever the item is added to an order.
- Get free quantity: Enter the number of items a customer must purchase at a specific price level (1 – 10) to receive a certain amount of product for free. Enter the number the customer will receive for free and enter the limit of free items.
- Get Discount Quantity: Enter the number of items a customer must purchase at a specific price level (1 – 10) to receive a certain amount of product at a discount. Enter the quantity the customer will receive at a discounted rate and the pricing level the customer will receive for that discount (1 – 10). Enter the limit of discounted items.
- Click 'OK'.
- Repeat Steps 10 – 12 until all discounts have been entered.
- Click 'OK'.
View a store sales goal
- Open the Sales Goals Store tab (Administration > Sales > Sales Goals > Search Store Sales Goals).

- Use the filters to locate the store sales goal.
- Pending: A sales goal has a status of pending when it is created. The application automatically processes the sales goals each night. If the sales goal period meets the date criteria, the application changes the sales goal to Active. If the sales goal period includes the current day, you can immediately activate the sales goal using the Process Sales Goals option (Administration > Sales > Utilities).
- Double click a store sales goal, or highlight a sales goal and click Update.
- View or modify the sales goal.
- Changes can be made to sales goals in any status (pending, achieved, not achieved and canceled).
- Click 'OK' button to save changes.
Security Permissions Required
|
Category |
Function |
|
Administration-Sales |
*Can Access Sales Tree Branch |
|
Promotions |
Implications
Sales Promotions will appear on the Employee Tab for employees to view upcoming, current and past sales promotions.
Related Reports
-
Promotion Analysis (Administration > Reports > Sales > Promotions > Promotion Analysis): Analyze the success/response to a sales promotion. All Items that were connected with the promotion will be displayed for analysis.