
The Balance Sheet is a primary financial statement that presents the companies Assets, Liabilities, and Equity as of a specific date in time.
-
Assets: Items possessing service or use potential to an owner or business.
-
Liabilities: Claims against asset, debts, or obligations owed by one entity (the debtor) to another entity (the creditor) in money, goods, or services.
-
Equity: Residual interest in the assets of a company that remains after deducting its liabilities. Also, the amount of a business' total assets less total liabilities. Also, the third section of a balance sheet, the other two being assets and liabilities.
-
The Balance Sheet is an integral part of the company financial statements as a whole. A Balance Sheet measures the overall worth of the company in terms of its Assets and Liabilities.
-
Balance Sheet only includes posted transactions
-
Financial statements only include journal entries that are posted to General Ledger. Journal entries are either automatically, or manually posted to the GL.
a. Automatically: When setting up the system, you define the number of days the system will wait before automatically posting a transaction to the General Ledger using the System Parameters screen (Administration System > Evosus Defaults > System Parameters > Accounting tab> Days to delay auto posting field). For example, if the system is set up to wait 30 days, the system posts every day but only transactions created 30 days before are posted.
a. Manually: Use the Initiate Posting Process option (Administration > Accounting > Accounting Desk > Initiate Posting Process) to manually post journal entries to the General Ledger.
You should post up to the report dateBe sure to post all of the journal entries in the time period included in the report. For example, if you run the report for June 2017, all of the journal entries in June 2017 should be posted to the General Ledger.
Pre-Posting Report displays JEs not be included on the financial statement
The Pre-Posting Report displays journal entries that are ready to post to the General Ledger. If you run this report for the dates included in the financial statement, you can see a list of journal entries that will not be included in the financial statement. You should post these journal entries to the General Ledger before generating the financial statement.
To run a Pre-Posting Summary Report, check the Display Pre-Posting Report box on the Posting screen (Administration > Accounting > Accounting Desk > Initiate Posting Process).
Generate a Balance Sheet
- Open the Financial Statements screen (Administration > Accounting > Accounting Desk > Balance Sheet).
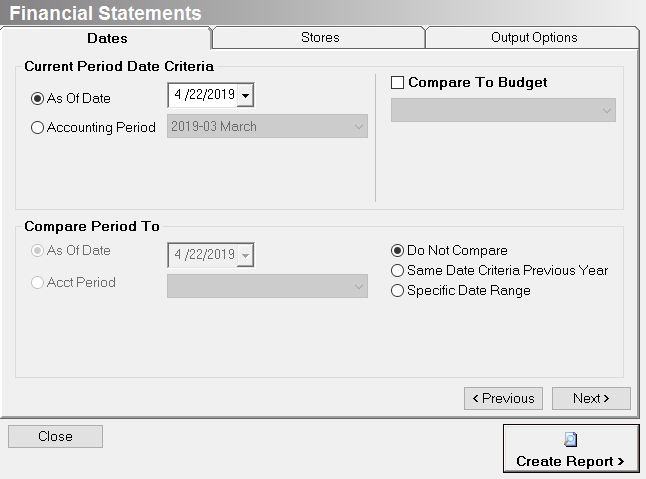
- Select an option in the Current Period Date Criteria section.
- As Of Date: Input a specific date
- Accounting Period: Select Accounting Period from the drop-down menu
- (optional) Compare actual to a budget.
- Check the 'Compare To Budget' box and then select a budget from the drop-down menu.
- (optional) Compare current to period.
- Do Not Compare: Select this option if you do not want to compare the current Balance Sheet to historic data.
- Same Date Criteria Previous Year: Select this option to compare the current Balance Sheet to the same period of time during the previous year.
- Specific Date Range: Select this option to enable the As Of Date and Accounting Period fields.
- (optional) Use the Stores tab to select the stores to include on the report.
- Each transaction is tagged with a store. This allows you to group and filter transactions by store.
- Complete the Output Options tab. Exclude Accounts that are Zero - Exclude all GL accounts that have a zero balance. This can simplify and reduce the length of the report.
- A GL account with a zero balance will still be included on the report if it has a budgeted amount.
- Exclude Cents from Amounts: Check this box if all GL account balances should display in dollars. When this option is selected, a Rounding item is added to the Earnings section. This item displays the sum of the rounded amounts to balance the report. Generally, this item is between 1 and 5 dollars.
- Show Percentage of Sales (Income Statement): Check this option to add a % Sales column to the report. This column displays the Gl account total as a percentage of total sales for all revenue and expenses.
- Suppress Report Filters, Suppress Date/Time Stamp on Statement: The report filters displays at the top of the report, and a date/time stamp displays at the bottom of the report. Check these options to remove the text from the report.
- Suppress Account Codes: Select this option to remove the GL account codes from the report. This can be useful when generating financial statements for third parties - for example, banks.
- Summary Statement: Select this option to remove account level detail.
- When this option is selected, the GL accounts inside a summary folder are grouped together. A folder in the chart of accounts is set up as a summary folder if the 'This is a Summary Folder' box is checked (Administration > Accounting > General Setup > Chart of Accounts > Open a folder).
- Display Months as Columns, Display Quarters as Columns: Use these options to add month or quarter columns to the report. This is useful if you want to compare information across multiple months or multiple quarters.
- You must use the As Of Date option on the Dates tab to select these options.
- Statement Title: This is the title that displays at the top of the report. For example, you can change the title of the report to Profit & Loss.
- Output to Excel (Formatted), Output to Excel (Unformatted): Select one of these options to export the Income Statement to MS Excel.
- Click Create Report when complete.
Security Permissions Required
| Category | Function |
| Administration – Accounting | *Can Access Accounting Tree Branch |
| Report - Balance Sheet |
Related Video Content: