

Before you start: Set up the commissions GL accounts
The default commission expense and commission payable accounts are set up using the Accounting Defaults screen.
-
Open the Accounting Defaults screen (Administration > Accounting > General Setup > Accounting Defaults).
-
Open the Accounts Payable tab.
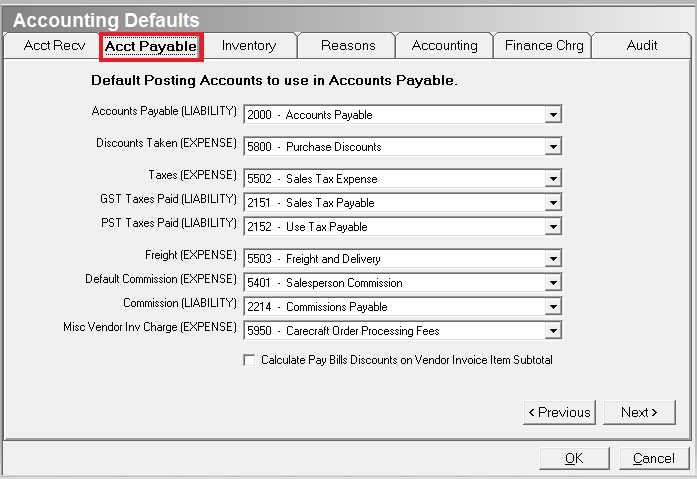
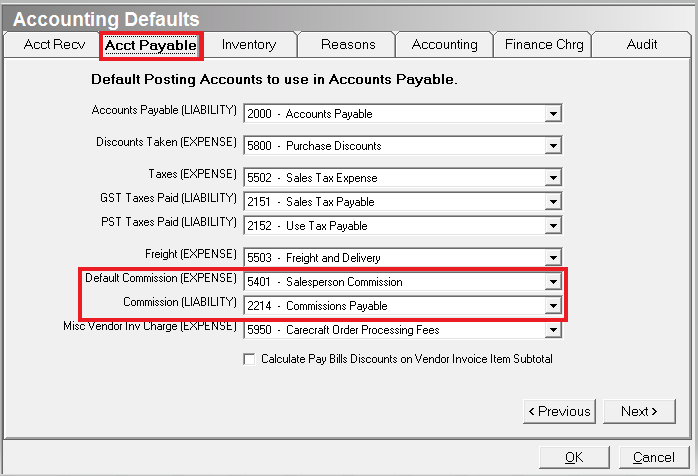
3. Default Commission (EXPENSE) - This GL account is debited when commissions are marked as paid in Step 5.
4. Commission(LIABILITY) - This is the commission payable account. This GL account is credited when commissions are marked as complete in Step 5.
Setting Up Commissions:
Step 1: Add a new commission period
Use the New Commission Period screen to create a new Commission period. The commission period is used to track employee commissions, and it determines the payable date of the commissions. For example, if you pay out commissions every month, you can create a commission period titled July Commissions and give it a payable date of 08/01.

- Open the New Commission Period screen (Administration > Sales > Commission Tracking > Add Commission Period).
- You can also click Add on the Commission Period Search screen (Administration > Sales > Commissions Tracking > Search Commission Periods).
 2. Name - Enter the name of the commission period, e.g. June Commissions, or July Bonuses.
-
Employees can view their commissions by commission period using the My Commissions button on the Employee tab on the main menu.
3. Payable - Date the commission expense will post to the General Ledger once the commissions period is marked as paid.
-
See Posting Overview for information on posting.
4. Click Save and Add Transactions to save the new commission period.
-
The accounting period for the payable date selected is closed - You must create a new Accounting Period before adding a new Commission period.
-
Once the commissions period is created, you can add transactions to the period using the Search Commission Periods option (Administration > Sales > Commissions Tracking > Add Commission Period > Select a period and click the Edit Transactions button).
Step 2: Select the transactions
Once the commission period is created, select the transactions to pay commissions on. These transactions are added to the commission period that you just created.
You can perform this step at any point as long as the commission period has not been paid.

-
Open the Commission Period Search screen (Administration > Sales > Commission Tracking > Search Commissions Periods).
-
Double click on a commission period. The Commission Period screen appears.
-
You created the commission period in Step 1: Add a new Commission period.
-
All of the transactions added to the commission period display on the Commission Period screen.
-
Transactions appear in a blue text if commissions have already been calculated. Commissions are calculated after the transactions are selected in Step 3.
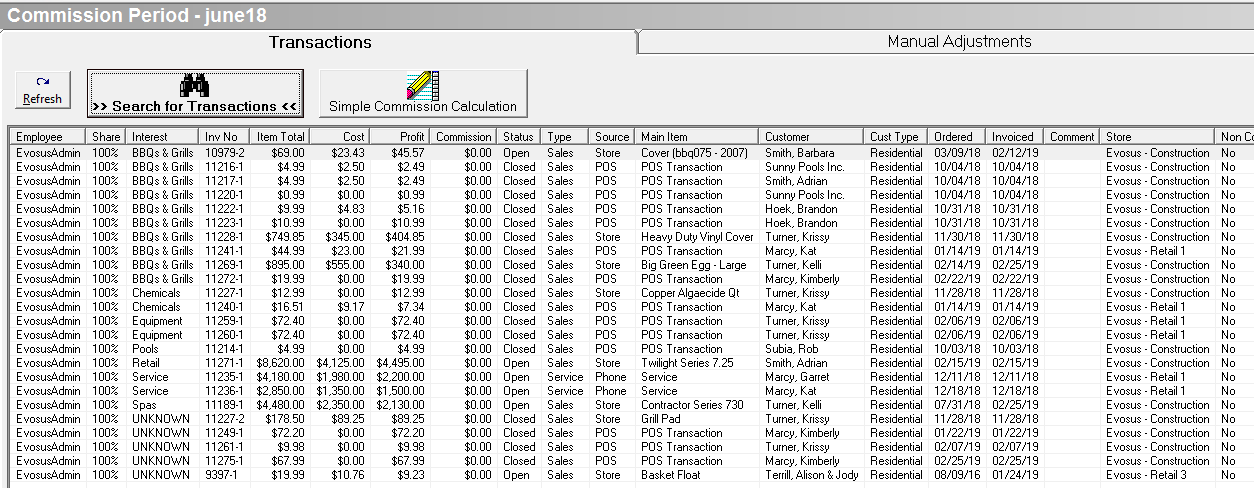
3. Click Search for Transactions. The Commission Request Search screen appears.
4. Use the filters to search for the invoices you want to record commissions on.
-
Just Closed Invoices: Check this box if you only pay commissions on orders that have been invoiced and closed.
-
Invoice Interest: Filter by marketing interest, e.g. stoves, spas, pools or chemicals.
-
Employee: You can use this field to record the commissions on one employee at a time.
-
Invoice Total: This field is helpful if you only pay commissions on invoices greater than a specific dollar amount. For example, enter $500 if you only pay commissions on invoices greater than $500.
-
Store/Department: You can use this field to record commissions one store/department at a time.
-
Exclude Invoices Older Than: Use this field to exclude invoiced older than a specific date.
-
Only transactions that have not already been added to a Commission period are displayed.
6. Select the transactions you want to record commissions on.
7. Click Move To Commission Period.
-
The selected transactions are removed from the screen and added to the commission period.
-
You can add additional transactions to the commission period, or proceed to Step 3.
Step 3: Calculate commissions on the selected transactions
Once you select the transactions, you can either use the system or an MS Excel spreadsheet to calculate commissions.
-
Simple calculation: Use the application to calculate commissions by applying a percentage to the item total, invoice total, or profit.
-
More complex calculations: Use an MS Excel spreadsheet to perform more complicated commission calculations, e.g. a graduated commissions scale.
Option A - Use the application to calculate commissions (simple calculations)
1. Open the Commission Period Search screen (Administration > Sales > Commission Tracking > Search Commission Periods).
2. Double click on a commission period. The Commission Period screen appears.
-
You created the commission period in Step 1: Add a new Commission period.
-
All of the transactions that you added to the commission period are displayed in the Commission Period screen.
-
Transactions appear in a blue text if commissions have already been calculated. Commissions are calculated after the transactions are selected.
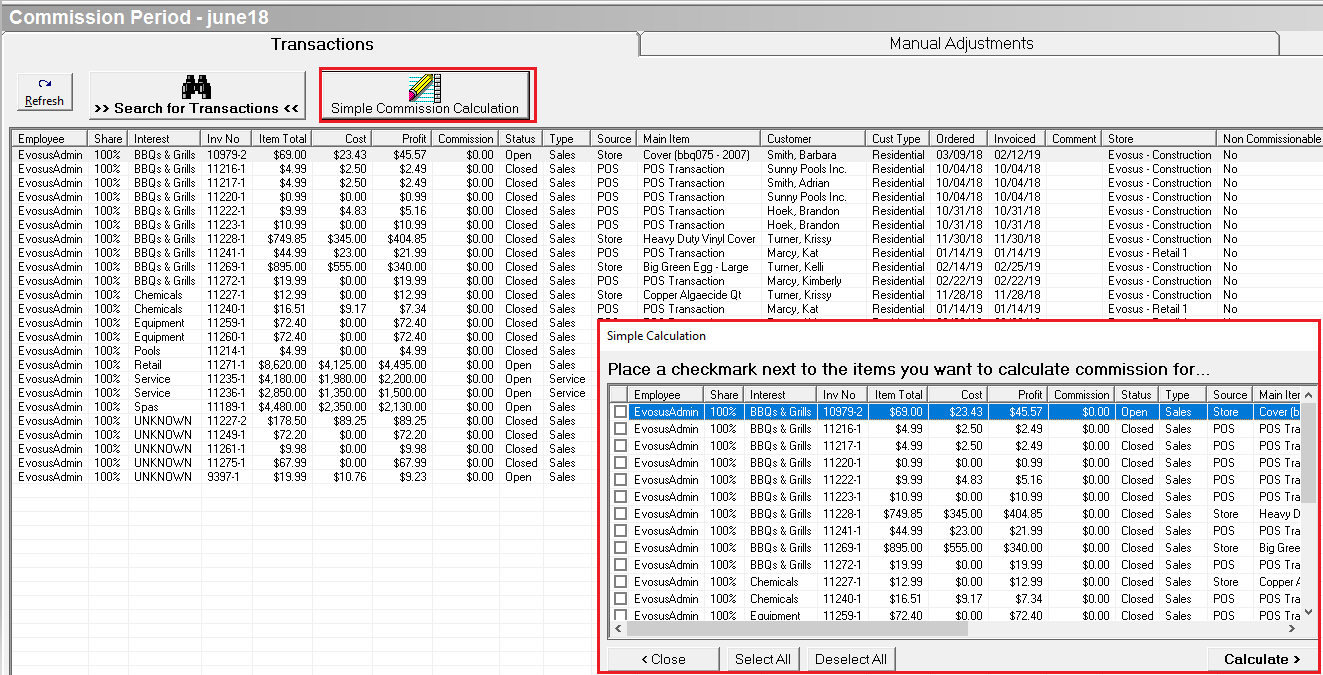
3. Click Simple Commission Calculation. The Simple Calculation screen appears.
4. Select the transactions you want to include in the calculation.
-
Transactions appear in a blue text if commissions have already been calculated. Commissions are calculated after the transactions are selected.
-
The Item Total and Profit both appear on the Simple Calculation screen. Just click Cancel to return to the Simple Calculation screen.
-
Double click on a transaction on the Commission Period screen to view the Invoice Total. Just click Cancel, and then Close to return to the Commission Period screen, and then double click on a transaction.
6. Enter the Pay Percent.
7. Click Calculate. The Commission Questions screen appears.
8. Select the GL Account.
The following journal entry is created when commissions are marked as paid in Step 5. The post date is the payable date set up on the commissions period.
|
|
Debit |
Credit |
|
Commission Expense |
Commission Amount |
|
|
Commission Payable |
|
Commission Amount |
-
You can use commission categories to group transactions, e.g. Regular Commissions, or Bonuses.
-
You can use commission categories to filter the commissions that appear on the Commission Report.
-
The calculated commission amount is displayed in the Commissions column on the Simple Calculation screen.
-
Click Close to return to the Commission Period screen.
Option B - Calculate commissions using an MS Excel spreadsheet (for more complicated calculations)
If you want to perform more complicated commission calculations, follow the steps below to export the transactions to an MS Excel spreadsheet, calculate the commission amount using your own formulas, and then import the commissions back into the application.
Export
- Open the Commission Period Search screen (Administration > Sales > Commission Tracking > Search Commission Periods).
- Select the commission period.
- You created the commission period in Step 1: Add a new Commission period.
- Click Print/Export.
- (optional) Use the filters to limit the transactions included in the MS Excel spreadsheet.
- By default, the spreadsheet includes all of the transactions that you added to the commission period in Step 2: Select the transactions.
- Commission Category: A commission category is added to the transactions when a GL commissions expense account is selected.
- Select 'Directly to Excel' on the Output tab. Click Preview Report.
- Enter the calculated Commission amounts in a spreadsheet
- Open the exported spreadsheet.
- Enter the commission amounts in the Commission Amount column. For example, apply your customized formula to the columns on the spreadsheet and populate the Commission Amount column with the commission amounts.
- Skip the Commission Category and GL Account fields.
- The Commission category and Commission expense account is selected when the commissions are imported
- Save the updated MS Excel spreadsheet.
Import - Open the Commission Period Search screen (Administration > Sales > Commission Tracking > Search Commission Periods).
- Select the commission period.
- Click 'Import'.
- Click 'Yes'.
- Select the spreadsheet and click Save. The Import Data screen appears.
- Select the transactions you want to import.
- Click Import Transactions. The Commission Questions screen appears.
- Select the GL Account.
The following journal entry is created when commissions are marked as paid in Step 5. The post date is the payable date set up on the commissions period.
|
|
Debit |
Credit |
|
Commission Expense |
Commission Amount |
|
|
Commission Payable |
|
Commission Amount |
- Select a Category or enter a new commission category.
-
You can use commission categories to group transactions inside a commission period, or group commission adjustments together.
-
You can use commission categories to filter the commissions that appear on the Commission Report.
- Click 'Continue'.
-
Success displays in the Import Status field if the import was successful. The transaction also appears in blue text.
- Click 'Close' or import additional transactions.
Step 4: (optional) Adjust the commissions
There are two ways to manually adjust the calculated commissions:
-
Update the commission on an existing transaction - Manually adjust the commission calculated on an existing transaction. For example, use this option if you want to manually increase or decrease the commission calculated on a transaction. You can also use this option to change the commission category, commission expense account, or change the transaction to Non-Commissionable.
-
Manually create a new commission - Manually create a new commission using the Manual Adjustments tab on the Commission Period screen.
Option A - Update the commission on an existing transaction
-
Open the Commission Period Search screen (Administration > Sales > Commission Tracking > Search Commission Periods).
-
Double click on the commission period.
-
You created the commission period in Step 1: Add a new commission period.
-
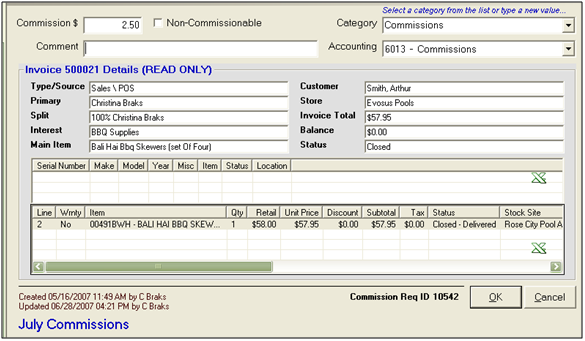
Double click on a transaction. The Commission Request screen appears.
-
Commission - Enter the Commission amount.
-
Non-Commissionable - Check this box if a commission should not be calculated for this transaction.
-
Category - The commission category was added to the transaction in Step 3.
-
You can use commission categories to filter the commissions that appear on the Commission Report.
- Accounting - Select the commission expense account.
The following journal entry is created when commissions are marked as paid in Step 5. The post date is the payable date set up on the commissions period.