
Create a Journal Entry
- Open the General Journal Entry Search screen. There are several ways to get to this screen.
- By default, this screen displays all journal entries from the last year that have not been posted.
- Click Add. The General Journal Entries screen appears.
- Click Recurring Schedule to create a recurring journal entry. Refer to the video below for detailed information about creating recurring journal entries.
- Post Date: Date the transaction will post to the general ledger. You must select a date in an open accounting period.
- Depending on how you set up the application, journal entries either automatically post to the General Ledger after a specific number of days, or you manually initiate the posting process using the Initiate Posting Process option (Administration > Accounting > Accounting Desk).
- Reference: We recommend that you enter abbreviations based on the type of transaction or the person creating the journal entry.
- For example, a payroll entry might be PJE1 and an adjusting entry to resolve an inaccurate posting could be AJE1.
- Comment: Describe why the journal entry is being created.
- This is for reference when reviewing journal entries from the General Journal Entry Search screen, but this text does not display on the general ledger report.
- Auto Reverse: Check this box and select a date in the drop-down menu if you want the system to automatically reverse this transaction on a specific date.
- This option can be useful when closing a month or at year end. For example, you can make an adjustment on the last day of the month and have the system create a reversing journal entry on the first of the following month. The date of the reversing entry must be at least one day after the original journal entry.
- There are two options for entering journal entry details. You can use both options. For example, you can import the journal entries and then manually enter additional journal entries.
Option 1: Enter data directly into the grid
a. Select the Posting Account.
- Click Add Account if the account does not appear in the drop-down menu.
b. Debit /Credit: Enter the amount.
c. Memo: Enter an explanation of the entry. Each memo will print on the general ledger.
d. Store: Select a store from the drop-down menu.
- All journal entries are associated with a store. This allows you to group and filter your financial reports by store.
e. Repeat these steps until all debits and credits are entered, and the totals are in balance.
Option 2: Import data from a spreadsheet
Follow the steps below to import journal entries from an MS Excel spreadsheet. This will append the journal entries to any journal entries already entered on the General Journal Entries screen.
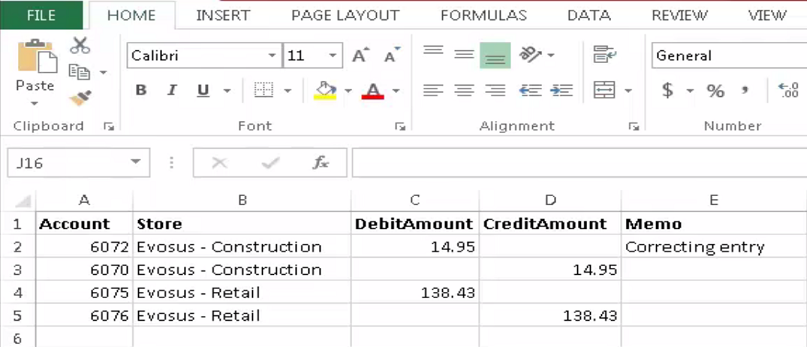
a. Create an MS Excel or Open Office spreadsheet with the following headings: Account, Store, DebitAmount, CreditAmount, Memo.
- The column heading must exactly match the image below.
- Enter the account code and store exactly as it appears in the system.
b. Click Import Spreadsheet on the General Journal Entries screen. The Import Journal Entry Spreadsheet screen appears.
c. Click […] and locate your spreadsheet.
d. Click Step 1: Stage Spreadsheet.
- Fix any errors: Errors in your spreadsheet display in the yellow field and details are listed in the grid. Correct the errors and then import the spreadsheet again. For example, if you labeled a column incorrectly, fix the column name and then import the spreadsheet again.
e. Click Step 2: Import Spreadsheet. The journal entries are added to the General Journal Entries screen.
f. You can import another spreadsheet, or manually enter additional journal entries.
- Click OK to save the journal entry. The journal entry that you just created appears on the General Journal Search screen.
-
Manually post the journal entry
-
Unbalanced journal entry: If the debit and credit totals do not match, the system gives you the option of placing the journal entry on hold. Journal entries that are on hold cannot be posted to the General Ledger. If you place the journal entry on hold, it will appear on the General Journal Search screen. This allows you to update the journal entry later.
Create a recurring journal entry
Use the General Journal Search screen to open a saved journal entry and then click Make Recurring to create a recurring journal entry.
Watch the video below for detailed information about creating recurring transactions.
Security Permissions Required
|
Category |
Function |
|
Admin-Accounting |
*Can Access Accounting Tree Branch |
|
Can Make Manual GL Adjustments |
Related Reports
- View General Ledger transactions for a specified date range. This report has click-thru capability to easily view all sub-ledger transactions for a specific general ledger transaction.(Administration > Reports > Accounting > Posting Activity):Posting Activity
Related Video Content:
Use the General Journal Entries screen to create manual journal entries. For example, you can create a manual journal entry to fix an incorrect posting, enter data that was not transacted in the system, or create month or year-end adjustments.