
A site profile represents a tangible feature at a customer’s location. For example, Pool, Spa, Water Feature, Stove or Fireplace. The purpose of recording a site profile is to track equipment and/or site details, including specific readings per service visit.
There are two ways to add a site profile:
-
Manually - Create a new site profile
-
Copy an existing site profile - Copy an existing site profile and then make changes to the profile
Create a Site Profile
Step 1: Enter the basic information
- Go to Administration > Service and Delivery > General Setup > Site Profile Setup.


3. Name - Enter the site profile name - for example, Pool, Spa, Stove, Water Feature, etc.
4. Click OK. The Site Profile screen appears.
Step 2: Enter the site profile attributes
These are going to be the characteristics for these "Sites" or locations where you will be performing service orders. For example, if you go to residential sites a lot some consistent PERMANENT items that are common could be a waterslide, gate code, the type of pool, if they have a dog, etc.
-
Right click on the Site Attributes section and select Add from the menu that appears.
-
Once highlighting the selected Site Attribute, you have to give the options under the Default Values. Highlight the site attribute > Right-click on the default values section > Provide ALL options. For example, for the gate code example above, I could enter the gate code here.
-
Click OK when complete. The new site attributes appear in the list.
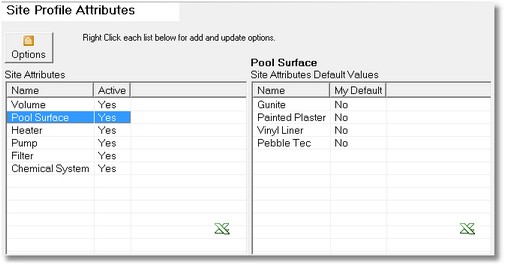
Step 3: Enter the site attribute default values
-
Select a site attribute.
-
Right-click in the Site Attribute Default Values section.
-
Do you want service techs to enter a number, or select a value from a list?
-
Force number entry: Select this option and then enter a range, default value, and increment amount. For example, if the site attribute is pool volume, enter 0 for Low, 1,000,000 for High, 0 for the default, and 100 for the Increment By. When a service tech enters the volume, s/he can enter a volume from 0 to 1,000,000 in increments of 100.
-
Allow Text Entry: Select this option if you want the tech to select an option from a list, and then enter the options.
-
You cannot change from forced number to allow text, you will have to delete the attribute and re-enter it with the correct choice.
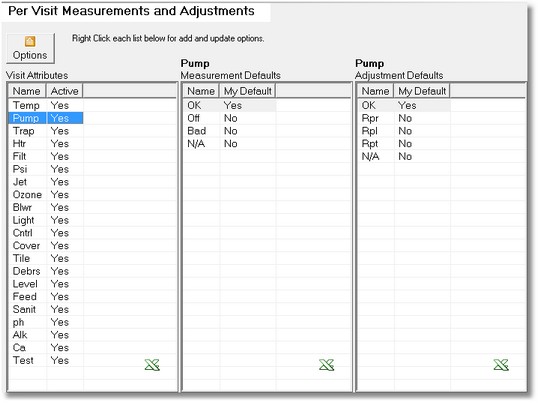
Step 4: Set up the per visit attributes
Per visit attributes are attributes that might change each time a service tech performs a service - for example, pool temperature, pH, if the pump is on, etc.
-
Right-click in the Visit Attributes section and select Add from the menu that appears.
-
Enter the visit attributes - for example, light, pump, trap, heater, filter, pump, pH, etc.
-
Click OK to save.
-
Click on a visit attribute to select it.
-
Right-click in the Measure Defaults section, and select Add from the menu that appears.
-
Measure Defaults are the values you want the service tech to measure when they arrive at the site. When entering the initial measurement, do you want service techs to enter a number, or select a value from a list?
-
Force number entry: Select this option and then enter a range, default value, and increment amount. For example, if the per visit attribute is pH, enter 6.8 for Low, 8.2 for High, 7.5 for Default, and .1 for Increment By.
-
Allow Text Entry: Select this option if you want the tech to select an option from a list, and then enter the options.
7. Click OK when complete to save the measure default.
8. Right-click in the Adjustment Defaults section, and select Add from the menu that appears.
9. Adjustment Defaults are the measurements they enter after performing the service. These can be set up in two ways:
-
Before and after value: If the per visit attribute is pool temperature, the service tech enters the temperature of the pool when they arrive (this is the measurement default), and the temperature that they adjusted the pool to (this is the adjustment default). In this example, the Adjustment Defaults and Measurement Defaults would have exactly the same setup.
-
Adjustment: If the per visit attribute is pH, the service tech enters the pH of the pool when they arrive, and the pH change once the service is complete. In this example, the Adjustment Defaults and Measurement Defaults are set up differently. For example, if the per visit attribute is pH, the adjustment default might be -1.0 for Low, 1.0 for High, 0 for Default, and 0.1 for Increment By.
10. Click OK to save the adjustment measure default.
11. Add measurement defaults and adjustment defaults to all of the visit attributes.
-
This is going to be EVERYTHING that you want your tech to measure/check for while looking at this Site (ex. for a pool you want them to measure the pH, temperature, if the pump is working, etc.)
Step 5: (optional) Enter a legend
The Legend is a text field to define abbreviations that you have used on site profiles visit. The legend will print on customer documents so that the customer can refer to it when reading their Per Visit information. The legend is Quick Text enabled.
Step 6: (optional) Enter notes on the whiteboard
The Whiteboard allows you to enter generic text notes to the Site Profile Type. These notes can be updated by any employee, but cannot be seen by the customer. Quick Text is available by right-clicking on the Whiteboard.
Security Permissions Required
|
Category |
Function |
|
Administration-Service & Delivery |
Can Access Service & Delivery Tree Branch |