
Create Customer Statements
Customer statements can be generated at any time based on open transactions in the Accounts Receivable Aging. Transactions include customer invoices, statement charges, progress bills, job bills, finance fees, and credit memos. You can create statements for all customers, groups of customers or a specific customer.
- Open the Customer Statements screen.
-
Using the Customer tab: Right click on a customer on the Customer tab of the main menu and select Other Functions> Customer Statement. You can only print a statement for a single customer using this method.
-
Go to Administration > Accounting > Accounts Receivable > Customers Statements to print customer statements for multiple customers.
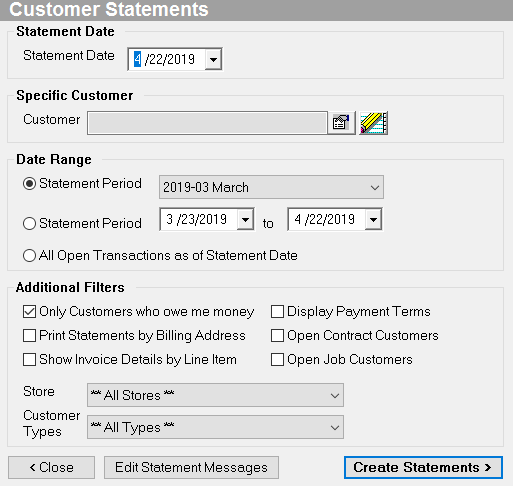
2. Statement Date: This date will print on the top of the statement.
3. Select a date range option.
-
Statement Period: Select an accounting period. Statements include transactions in this period.
-
Statement Period: Select a date range. Statements include transactions in the selected date range.
-
All Open Transactions as of Statement Date: Statements include all transactions that are open as of the Statement Date.
4. Select any additional filters.
-
Only Customers Who Owe Me Money: Exclude customers with a credit balance. This excludes customers whose only open transactions are credit memos.
-
Print Statements by Billing Address: Generate multiple statements for the same customer if different billing addresses exist on transactions. If this box is not checked, the system will create a single statement using the Default Bill To address. If you choose to print a remit slip when printing statements by billing address, the balances displayed in the aging period sections will be based on total amounts due and not based on billing address.
-
Show Invoice Details by Line Item: Include invoice line item details and delivery dates below each invoice on the statement.
-
Display Payment Terms: Include the payments terms next to each transaction, e.g. 15 Net.
-
Open Contract Customers: Filters the statement list by customers with open, active maintenance contracts. The statements will still include all AR transactions created in the period selected, but only maintenance contract customers will be included.
-
Open Job Customers: Filters the statement list by customers with open, active jobs. The statements will still include all AR transactions created in the period selected, but only job costing customers will be included. Selecting both Open Contract Customers and Open Job Customers will filter the statement list by customers that have an open, active maintenance contract and/or an open, active job.
-
Store: Only include customers that have an unpaid balance on invoices created in the selected store.
-
Customer Types: Only include customers of the selected type.
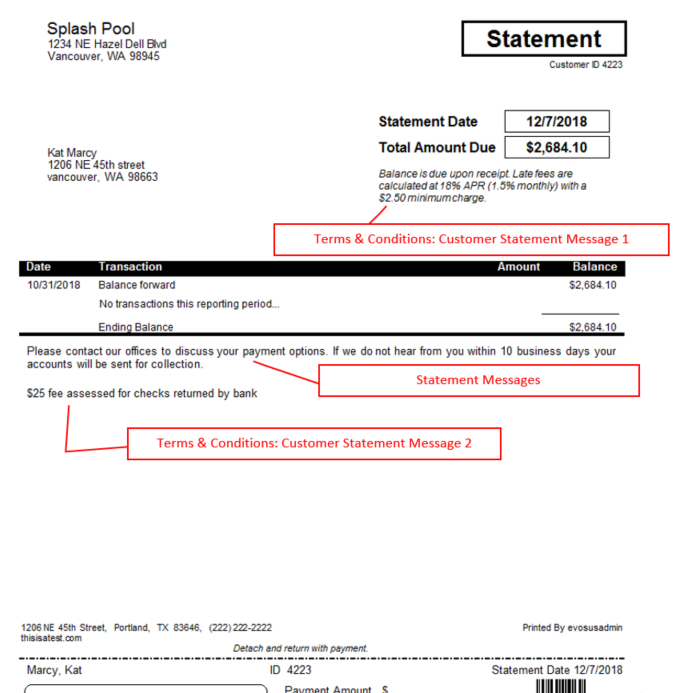
5. (optional) Click Edit Statement Messages to add or edit the information that prints on the statement based on the aging of the oldest transaction.
6. Click Create Statements to generate the customer statements. A list of statements populates in the screen.
-
Once statements are generated, you’ll see a list of all statements that match your filter selections.
7. View the customer statements.
-
Print with Remit Slip: Print a remit slip at the bottom of each statement.
-
Click Remove to remove highlighted statements from the list. This typically means you do not wish to send the statement to a customer.
-
Click Customer to open the Customer Profile for the highlighted statement.
-
Click Labels to print labels for the selected customers. Labels can be printed to Avery 5160 labels or to a label printer.
-
Aging Period: View statements by the aging of the oldest transaction. For example, select 90 Plus Days to print statements for customers more than 90 days overdue.
-
Communication Type: Select based on how customers want to receive statements. For example, select Email to select customers that prefer emailed statements. This option is selected in the Customer Profile > Options menu.
-
Sent: Exclude statements that have already been printed, emailed or saved.
8. Select the statements and click Statement to print, email, or save the selected statements, A note is recorded on the customer’s account when a statement is printed, emailed or saved as PDF.
-
Use SHIFT to select a range of customers: Hold SHIFT and click on the first and last customer in the range.
-
Use CTRL to select specific customers: Hold CTRL and click on each customer you want to select.
-
Print to Printer: Sends all highlighted statements directly to the selected printer.
-
Print to Screen: Generates print preview windows for the selected statements. You may only select 20 statements at a time when printing to the screen.
-
Print to PDF: Statements are saved as PDF files in EvoDocs>Statements on your server. The Statement folder will automatically appear once the PDF files are created.
-
Email: Sends an email to the customer with the statement attached as a PDF file. You may only select 15 statements at a time when emailing. When selecting Email, you will be prompted to enter an Email Subject and Email Body text. Quick Text is available in the Email Body field. Keep in mind the Email Subject and Email Body will be used for all emails to the selected customer although you’ll have a chance to edit the text by customer once the emails are generated. Click Create Emails. Outlook Message windows will appear. You can optionally edit the email text, then send the email.
Security Permissions Required
| Category | Function |
| Administration – Accounting | *Can Access Accounting Tree Branch |
| Administration - Accounting | Customer Statements |
Related Reports
- Accounts Receivable Aging (Administration > Accounting > Accounts Receivable > Accounts Receivable Aging): View all customers with an outstanding balance as of a specific date. The Report shows days past due and the amount that is owed.