
Add a customer payment
-
Open the Payment screen (Customer > Open a Customer > Payments/Refunds tab > Payments button OR Administration > Accounting > Accounts Receivable > Receive Customer Payment > Select a Customer).
-
Enter the Payment Amount.
-
Pay in Full: Pay for all transactions listed in the grid. This includes all open orders, invoices, statement charges, and finance charges.
-
Select a payment method.
-
If you select Check, you must enter in a check number before saving the payment.
-
Select a cash drawer to apply the payment to. The Cash Drawer must be open in order to receive the payment.
-
Apply the payment amount to the transactions.
-
Apply AR discounts/finance fees.
-
Apply credits.
-
Apply deposits.
-
Print Payment Receipt: Check this box to print a 4” POS type receipt that includes all transactions the payment was applied against.
-
The receipt opens after you click the Save Payment button. You can print or email the generated receipt.
-
Print Docs on Save: Print all related documents such as orders and invoices.
-
Remaining Balance Due: Displays the total of all transactions in the grid that remain unpaid.
-
Verify the Unapplied Amount is zero.
-
Click Save Payment to save the new payment.
Refund payment
-
Open the Payment/Refunds tab on the Customer screen (Customers > Select a customer > Payment/Refunds tab).
-
Highlight the payment you want to refund.
-
Click Refund. The Refund screen appears.
-
Input the refund amount.
-
Click Pay In Full to refund all transactions listed in the grid. This includes all open return invoices, credit memos, and deposits.
-
Select the payment method.
-
Select Check to automatically create a check in the Print Checks Queue. The AP person in charge of writing checks can print the check and send it to the customer.
-
Select the cash drawer.
-
The cash drawer must be open to create the refund.
-
(optional) Input a Memo.
-
Select the transactions to refund in the lower portion of the form. This applies the refund amount to specific transactions.
-
(optional) AmtToPay: Defaults based on the following: total refund amount entered in the Refund field, how much is due on each transaction, and how much has already been applied. You can change this amount if needed.
-
The AmtToPay cannot exceed the total due in the Balance column.
-
(optional) HoldBack
-
Print Payment Receipt: Check this box to print a 4” POS type receipt that displays all transactions the payment was applied against (if any exist).
-
Verify that the Unapplied Amount field is zero.
-
Click Save Refunds.
-
The Payments/Refunds tab appears, and it displays the refund that you just created.
Reprint Receipt
You can only reprint credit card receipts that were processed using Evosus Card Services. Follow the steps below to print a receipt: credit card merchant copy, credit card customer copy, or payment receipt.
-
Open the Payment/Refunds tab on the Customer screen (Customers > Select a customer > Payment/Refunds tab).
-
Highlight the payment you want to print the receipt for.
-
Select Options > Print Receipt, and then the type of receipt you want to print. This generates the receipt.
-
Print the receipt.
Record Finance Check
Keep in mind that payments with finance fees can only be applied to invoices, not orders. Follow the steps below to record checks received from financing companies.
-
Go to the Payment/Refunds tab of the customer’s profile.
-
Click Payment.
-
Enter the amount of the check. In our example, the check amount is $4,750.
-
Select a Method from the drop-down. Some dealers like to create a new check Payment Method specifically for financing checks payments, but that’s up to you.
-
Select the appropriate Cash Drawer from the drop-down menu.
-
Enter the Check Number.
-
Click Apply Discounts.
-
Enter the fee in the AR Finance Fee field. In our example, the fee is $250 (Fig. 1).
-
Click OK to save.
-
The AR Discount field in the grid and the Applied Discounts field in the payment summary will display the $250 fee. The AmtToPay field in the grid and the Applied Amount field in the payment summary will display the actual check amount (Fig. 2).
-
Click Save Payment.
Void Payment
-
Open the Payments/Refunds tab of the Customer screen.
-
Highlight the payment you wish to cancel.
-
Select Options > Void Payment.
-
Click Yes on the message that appears.
-
Enter the reason for the void and click OK.
-
The payment is voided.
Use the Payment/Refunds tab to view, add or update customer payments and refunds. You can also use the Payments/Refunds tab to cancel customer payments, add or update the card on file, or reprint a credit card receipt.
Add a customer payment
Use the Payments screen to apply payments, credits, finance fees, and AR Discounts for Orders, Invoices, statement charges and/or finance charges. Generally, the Payments screen is used when a payment is received over the phone or in the mail.
-
Payment automatically applied: The system automatically applies the payment to the transactions, starting with the oldest to newest invoice, and then finance charges, statement charges, and orders.
-
Manual adjustments: Select the transactions to apply the payment to, and adjust the value in the AmtToPay field. The amount cannot exceed the AmtDue.
-
AR discounts are discounts a customer receives for paying before the due date. For example, if the payment terms are 2%10/Net30, the customer receives a 2% discount if they pay within 10 days.
There are two way to apply discounts:
-
Manually enter discount: Enter the discount amount in the AR Discount field. You can double click on a transaction to see the original payment terms.
-
Apply discounts (Use this option to apply finance fees): Highlight the transaction you want to apply the AR discount or finance fee to and click Apply Discounts. Enter the AR Discount and click Close.
-
Apply a finance fee: A finance fee is an amount kept by the financing company for processing the customer loan/lease. Enter the total check amount in the Payment field. Select the transaction to apply the finance fee to and click Apply Discounts. Enter the AR Finance Fee and click Close. The AR finance fee will post to the Finance Fee expense account selected on the Accounting Defaults screen (Administration > Accounting > General Setup > Accounts Receivable tab > Finance Fee (EXPENSE) field). Finance fees can only be applied to invoices, not orders.
-
Credits can come from refunds, unapplied payments, or manual entry by your staff. Credit can be applied to invoices, statement charges, and finance charges. Credits cannot be applied to orders.
There are two ways to apply credit:
-
Manually enter credit: Enter the credit amount in the Credits field. The system will automatically apply credit memos to the transactions, starting with the oldest.
-
Apply Credit button: Select a transaction to apply the credit to and click Apply Credit. All available credits and deposits display. Enter the amount to apply in the ApplyAmt field. Click Close when complete. The Credits column displays the applied credits.
-
Add a Credit Memo: Click Add Credit Memo to grant a customer credit.
-
Generally, deposits are associated with a specific order and automatically applied to the subsequent invoice. But you can apply the deposit to a different transaction.
-
Highlight the transaction you wish to apply the Deposit to. Click Apply Credit and locate the Deposit you wish to apply. (Note: Deposits are denoted with Deposit-Order while Credits are denoted with CRM). Enter the amount you wish to apply and click Close.
NOTE: Once you save the payment a message will appear saying “WARNING: Mismatched Deposit”. It is basically saying the deposit was originally associated to one order and now you are removing it from that order and applying it to a different transaction. Are you sure you want to do this? Sometimes this message will appear if you enter an amount directly into the Credit column IF a deposit was next in line to be applied (on the Apply Credit screen Say No to the message if you do not wish to apply the deposit).
-
There should only be a value in the Unapplied Amount field if the customer overpaid or is not applying the money to any invoices.
-
Payment not entered correctly: Verify the amounts entered in the AmtToPay column are correct. Generally, you want the AmtToPay column total (the Applied Amount) to match the Payment field.
-
Customer overpaid: Apply the payment to the available transactions and the remaining Unapplied Amount automatically creates a credit memo. The credit memo can be refunded or used for future transactions.
-
You do not wish to apply the payment to any transactions: Click Save Payment and a credit memo is created for the amount of the payment. The credit memo can be refunded or used for future transactions.
Refund payment
Use the Refund button to refund Return invoices, credit memos, and deposits. Payments are entered from a different screen. You can also charge a fee for the refund using the holdback account. This is useful if you want to charge the customer 25% for returning an item.
-
The system will automatically select transactions to be paid starting with invoices from oldest to newest. Next, are credit memos and deposits. You can adjust the transactions that are selected. You can also adjust the amount applied to each transaction.
-
You have to apply the entire refund before you can save it. That means the Unapplied Amount field must be zero before you click the Save Refund button.
-
Do not select any transactions if you are applying the refund to a customer’s account, but do not wish to apply the refund to any transactions.
-
If the unapplied amount is not $0.00, the Refund amount does not match the amounts entered in the AmtToPay column. Double check the amounts in the AmtToPay column and make adjustments as necessary.
-
If you do not wish to apply the refund to any transactions, do not make any adjustments to the AmtToPay column.
Record Finance Check
If you work with a financing company, such as GE or Textron, you will often receive checks from the financing company with their fees withheld from the balance. For instance, your customer purchased an item for $5,000 and financed it through GE. A couple of weeks later, you received a check from GE for $4,750. The difference of $250 was the fee GE withheld for their services. Let's use this example and walk through how to enter this payment in Evosus.
-
You can create a new payment method for financing checks received from your financing vendors if you would like. For instance, you could create a check payment method called “Financing – GE.” Users would select this option whenever they receive a check payment from GE. Alternatively, you could simply use your existing Check payment method.
-
To create a new payment method, go to Administration > Accounting > General Setup > Payment Methods. Click Add and enter the name of the payment method, such as Financing – GE. Select Collection from the Category drop-down. Select Check from the Type drop-down. Check the box “Do Not Display in Point of Sale” to prevent users from selecting this payment method in POS. Click OK to save.
Void Payment
Payments can be canceled on customer Open Orders or Open Invoices that have not posted to the subledger. Payments may need to be canceled if payment was applied to the wrong customer or a duplicate payment was entered. Payments should only be canceled if the payment needs to be completely removed from the customer's order. Payments can be edited from the Administration tab if changes such as cash drawer, store or payment method need to be made. Because Evosus requires all transactions to be corrected in reverse, the following information must be taken into account:
-
Determine the status of the payment. Has it been deposited in Evosus?· Has the deposit been reconciled in a Bank Statement in Evosus?
-
If reconciled in Evosus Bank Statement, you will want to screenshot/export all transactions for that Bank Reconciliation, because you will need to Void it and then re-create after other steps for correction, have been made· Screenshot Bank Reconciliation Profile page that includes Bank Acct name, Ending Balance, etc (save all to Desktop for later use)· Export Deposits detail to excel spreadsheet· Export Withdrawals detail
-
Void Bank Rec
-
If deposited in Evosus, screenshot Bank Deposit details (save to re-create Bank Deposit later)
-
Void Bank Deposit
-
Void Customer Payment
-
Must change Processing Date to original date that customer payment was originally posted
-
Once Processing Date matches the original receipt date, enter customer payment to correct account
-
Review customer balance to ensure posting as intended
-
Change Processing date back to the current date
-
Re-create Bank Deposit using the original date
-
Re-create Bank Reconciliation
Security Permissions Required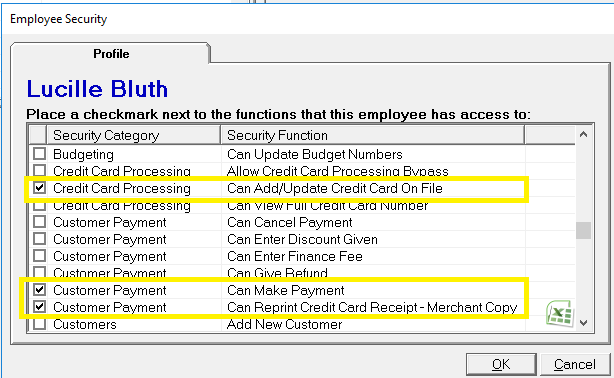
Implications
Receive Payment
-
The Finance Fee posting account is determined by the account selected in Accounting Defaults.
-
The AR Discount posting account is determined by the account selected in Accounting Defaults.
Related Report
-
Cash Drawer Activity (Administration > Reports > Accounting > Banking > Cash Drawer Activity Report): Detailed view of customer payments made for a specific date range.
-
Cash Payments Journal – Customer (Administration > Reports > Accounting > Banking > Cash Payments Journal - Customer): Detail of all Customer Payments for a specified Date Range.
-
Cash Payments Journal – Combined (Administration > Reports > Accounting > Banking > Cash Payments Journal – Combined): View vendor AND customer payments for a specified date range.
-
Customer Deposit Liability (Administration > Reports > Accounting > Accounts Receivable > Customer Deposit Liability): Report displays open deposits as of a specific date. The report can be run as of a backdate and used to tie out the deposit liability general ledger account.