
Enter a Return Transaction - POS
Click Return on the Transaction Type screen in POS if the customer wants to return an item that will be put back in inventory.
Step 1: Select a customer
Selecting a customer is important because it associates the return with a specific receipt. This ensures that sales are tracked correctly, and the customer receives the exact amount that they paid for the returned item(s).
-
Log into POS.
-
Click Return.
-
Click ‘Yes’ on the confirmation message that appears.
-
Select a customer. This allows you to associate the return with a specific sale.
-
Click Use No Customer to process a return without selecting a customer record.
Step 2: Select the item(s) to return
If you selected a specific customer in step 1...
- Select an item on the Link Return to Previous Invoice screen. The Return Quantity screen appears.
- Scan the barcode on a receipt to quickly locate the items. Click Search to locate the items on that receipt.
- What if the items don't display? If the items do not appear in the list, you can manually select them in the next step.
- Complete the Quantity To Return field.
- Press ENTER or click Add Items to Order.
- Repeat the steps above until all returned items are added to the return.
- Click Items.
If you didn't select a specific customer in step 1...
Follow the steps below to use the receipt number to associate the return with a specific receipt. This is not required, but it ensures the customer receives the exact amount that they paid for the returned item(s).
-
Enter the receipt number in the Invoice ID field and click Search.
-
Select an item in the lower portion of the screen. The Return Quantity screen appears.
-
Complete the Quantity To Return field.
-
Press ENTER or click Add Items to Order.
-
Click Items.
Step 3: Select a return reason
-
If you did not select a customer or receipt number - manually add the items that are being returned, and then use the Edit Items button to manually adjust the price and quantity.
-
Select a Return Reason.
-
Return reasons are created and maintained using the Search - Order Return Reasons screen (Administration > Sales > General Setup > Return Reasons).
3. Click Refund.
Step 4: Select how you want to refund the balance
-
Based on your return policy, select the repayment method
-
Account Credit: Select this option to add a credit to the customer account. This credit can be applied to their next purchase.
-
Check: If you select Check, the check will appear in the Print Checks Queue screen.
-
How They Paid Last Time: Click this button to see how the customer paid for the refunded items.
2. Click Finish.
Step 5: (Evosus Card Services) Refund a credit card payment
The Process Credit Card screen appears if you have Evosus Card Services and you select a credit card payment type.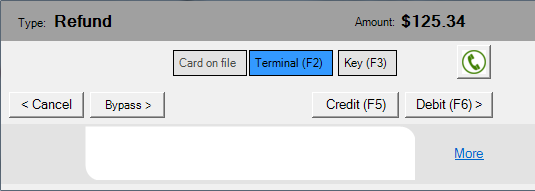
-
In POS > select the items > enter the credit card payment amount > click Finish. The Process Card screen appears.
-
Click Credit to process the transaction as a credit card, or click Debit to process the transaction as a debit card.
-
Transaction in Progress...Please Wait appears in the Use Pin Pad screen.
3. The customer follows the directions on the card reader. For example, the customer inserts their chip card into the card reader, confirms the purchase amount, and enters their pin number.
An approval message appears on the card reader and in POS, and the receipts are printed. The transaction is complete.
-
What if the card reader will not read the card? Click Key on the Process Credit Card screen to manually key in the credit card information. Enter the customer's zip code in the AVS Postal Code field and then click Credit.
-
You cannot manually key in a debit card transaction. Enter the credit card information and then click Make Payment.
Step 6: Pending Returns
A returned item has a status of Pending. Use the Pending Returns tab on the Inventory Transactions screen to move the item back into inventory, send it back to a vendor/RGA, or dispose of it.
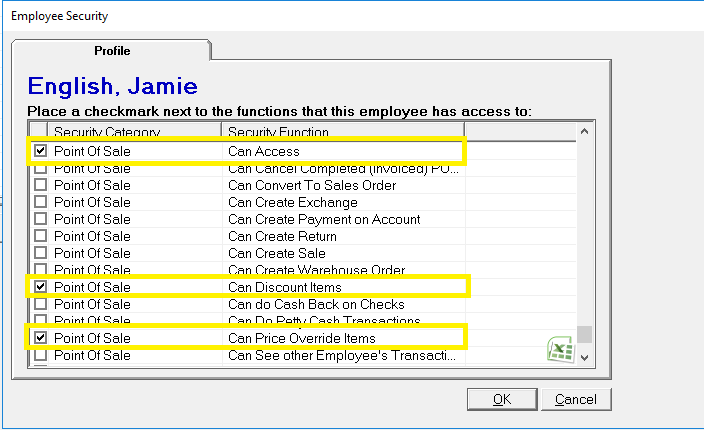
Security Permissions Required
Proper permissions must be set before an employee is able to perform this action. To give an employee permissions go to Administration > System > Security > Security - Employee Level Permissions > Double click to select Employee > Check the box of the permission you would like to grant them access to.
Implications
|
Transaction |
Debit |
Credit |
|
POS Transaction |
Returns |
Cash on Hand |
|
POS Transaction |
Inventory |
COGS |
Related Reports
-
Stock Movement (Administration > Reports > Inventory > Items > Stock Movement) Analyze the Stock Adjustments and Transfers made for a given period of time. Transactions may have been initiated by Sales, Returns, Service Orders, Physical Counts, or manual stock adjustments and transfers.
-
Cash Payments Journal – Combined (Administration > Reports > Accounting > Banking > Cash Payments Journal – Combined) View vendor AND customer payments for a specified date range.
Related Video Content: