
Debit Memos are credit extended to your company from a vendor or manufacturer for returned goods or other miscellaneous credit and can be used to pay vendor bills in Evosus. Debit Memos are associated with specific RGAs and Vendor Invoices so you can track why you received the credit and how you used it.
-
Debit memos can be applied to vendor bills.
-
Debit memos can be associated with specific RGAs and vendor invoices so you can track why you received the credit and how you used it.
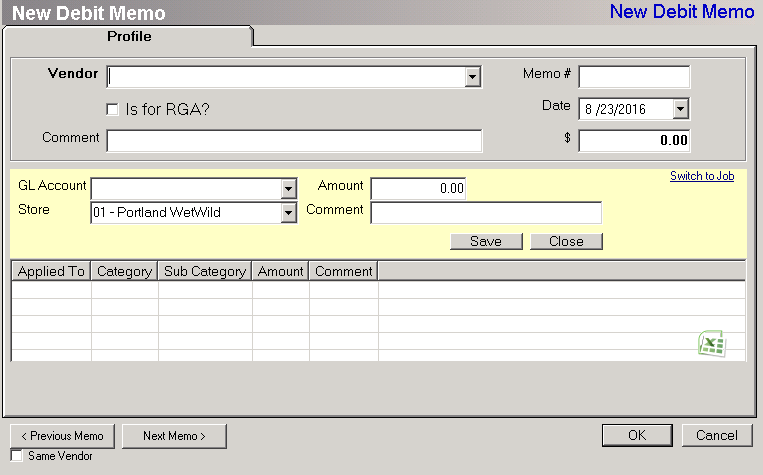
How to Manually Enter a Vendor Credit (Debit Memo)
-
Go to Administration > Accounting > Accounts Payable > Add Debit Memo, or Administration > Accounting > Return Goods Authorizations > Add Debit Memo to create a new Debit Memo.
-
Select a Vendor.
-
To quickly select an existing vendor, type the beginning of the vendor's name in the drop-down field.
-
Memo#: Enter the debit memo number from the vendor.
-
Is For RGA: Check this box if the debit memo is payment for an RGA.
-
When this box is checked, the Debit Memo automatically posts to the Accounts Receivable account. The AR account is set up using the Accounts Receivable tab on the Accounting Defaults screen (Administration > Accounting > General Setup . Accounting Defaults).
-
Comment: Comments appear on the Accounts Payable Aging Report.
-
Amount: Enter the debit memo amount.
-
Distribute the amount to a store/GL account, or a job. See details in the two options below.
- Click OK when complete.
-
You can apply the debit memo the next time you pay pills.
-
You can see the debit memo on the vendor using the Debit Memos tab on the Vendor screen (Administration > Accounting > Accounts Payable > Search Vendors > Open a vendor).
-
You can also see the debit memo using the Debit Memo Register (Administration > Reports > Accounting > Accounts Payable > Debit Memo Register). You can use this report to generate a list of unused debit memos.
-
If you checked the Is For RGA box the Apply RGA screen will appear for you to associate the Debit memo to an RGA.
Option A: Associate the amount to an open Job
-
Job: Select a job.
-
Jobs are created using the Add Job screen (Administration > Job Costing > Add Job).
-
-
Phase: Select a phase.
-
Jobs can be broken up into phases using the Phases tab on the Job screen (Administration > Job Costing > Search Jobs > Open a Job > Phases tab).
-
Cost Code: Every cost applied to a job is assigned a cost code. The cost code determines which expense account will be used when posting to the general ledger.
-
Amount: Enter the amount.
-
-
(optional) Comment: Enter a comment.
Option B: Associate the amount to a Store and GL Account
-
GL Account: Select a GL account.
-
Store: Select a store or department expense.
-
By default, this is the store or department that you are logged into.
-
Amount: Enter the amount to distribute to the selected GL account.
-
Security Permissions Required
|
Category |
Function |
|
Admin-Accounting |
*Can Access Accounting Tree Branch |
|
AP - Debit Memo - Can Create |