
Use the Make Deposit option to create a deposit for cash and checks for a cash drawer that is closed. You must close the cash drawer before you can deposit the cash and checks in the cash drawer.
What is the difference between a cash drawer and a cash drawer session?
-
Cash drawer: Cash drawers are created and maintained for each store.
-
Cash drawer session: Cash drawers are generally opened at the beginning of the day, and closed at the end of the day. The time when a cash register is open is called the cash drawer session. This is important because the transactions that occur during a cash drawer session are grouped together when making deposits.
Make a New Deposit
- Select the date and account

-
Select Administration > Accounting > Banking > Make Deposits. The Make Deposit screen appears.
-
Select the bank account where you want to make the deposit.
-
What if the bank account is not listed?: Bank accounts are created and maintained using the Chart of Accounts screen. Only accounts with the 'This is a bank...' box checked will appear in the drop-down menu.
-
Deposit Date:Date the deposit will post to the General Ledger.
-
We recommend that you select the date that you actually take the money to the bank. This will be helpful when it is time to reconcile the bank statement.
-
Click Next.
-
Select Stores/Departments

-
Select the stores/departments that you want to make a deposit for.
-
Select one store: Click Deselect All and select the correct store.
-
Transactions in an open cash drawer session cannot be deposited - Transactions cannot be deposited until the cash drawer session that includes those purchases is closed.
-
Have all of the cash drawers at a store been closed? Click Cash Drawer Status to see a list of all cash drawers and the status of those drawers. This is a quick way to make sure that all of the cash drawers at a store have been closed.
-
Click Next.
-
Select the cash
-
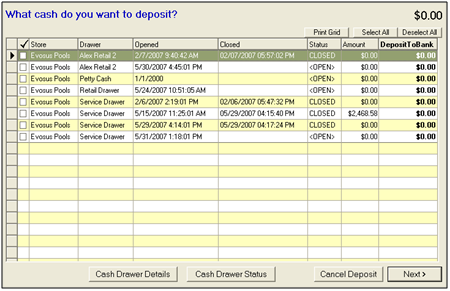
Select the cash you want to deposit.
-
This only applies to cash. Checks are selected in the next screen.
-
Each cash drawer session for the selected store(s) appears in the screen.
-
Select the cash drawer sessions you want to deposit. This updates the 'DepositToBank' column.
-
You can override the DepositToBank. For example, if cash was counted incorrectly when the cash drawer was closed, you can enter the correct amount in the DepositToBank field. Any adjustments are posted to the Over/Under account.
-
What if a cash drawer session does not appear?: The cash drawer has not been closed. See Close Cash Drawer for detailed information on closing a cash drawer.
-
Cash Drawer Details: Click Cash Drawer Details to view detailed information about the select cash drawer session.
-
Click Next once all of the necessary cash is selected.
-
Select the checks

-
Select the checks you want to deposit.
-
Each check is listed individually.
-
Select the checks to deposit. This updates the DepositToBank column.
-
You can override the 'DepositToBank' amount. For example, if a customer wrote the check for the wrong amount, enter the real check amount in the DepositToBank field. In this example, the customer account must also be updated. See Credit Memo if the customer paid too much, and see Statement Charges if the customer did not pay enough. The over/under amount will post to the Over/Under account.
-
Click Next once all of the necessary checks are selected.
-
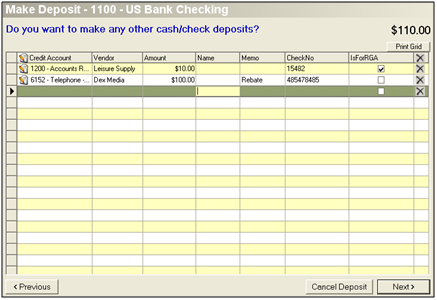
Enter manual deposits - RGA checks, tax refunds, rebates, etc.
-
Enter any other cash or checks you would like to deposit. This is where you enter manual deposits such as vendor RGA checks, tax refunds, rebates, or other miscellaneous sources of revenue.
-
Credit Account: Select the GL account to credit. Generally, this is an expense or revenue account. Never select a bank account or another asset account in this field.
-
Do not select an account when the Is For RGA box is selected. The Accounts Receivable GL account is automatically selected for posting. RGAs post to Accounts Receivable when sent to the vendor, so vendor RGA payments post to Accounts Receivable to clear out the initial RGA posting.
-
Vendor: Select No Vendor if no vendor is associated with the deposit. You must select a specific vendor if the deposit is for an RGA.
-
Amount: Enter the amount of the deposit (cash or check).
-
Name: Enter the name of the customer (optional).
-
(optional) Memo: This field does not appear in the General Ledger. You can enter a memo on the entire deposit on the next screen, and that memo will appear on the General Ledger.
-
(optional) Check Number: Enter the Check Number.
-
Is For RGA: Check if the cash/check is paying off an RGA request. Checking the box will prompt you to assign the payment to an RGA once the deposit is saved.
-
Click Next.
-
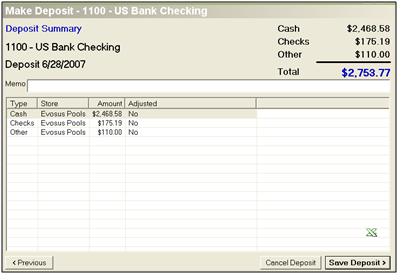
Complete the deposit
-
This screen displays deposits grouped by payment type.
-
(optional) Memo: This memo appears on the General Ledger.
-
Verify the deposit information is correct. The total amount deposited should match your bank deposit slip.
-
Click Save Deposit.
-
Click Yes on the verification message that appears.
-
Print the Bank Deposit Summary Report, or attach it to your deposit slip to record that it has been entered.
-
You can also use the Search Deposits screen to view deposits at any time.
-
Apply cash receipt to RGAs

-
If you checked the 'Is For RGA' box in Step 5, a message appears: "Do you want to apply this cash receipt against RGAs now?"
-
Click Yes to apply the deposit to an RGA. A screen appears and displays all of the open RGAs.
-
Select all of the RGAs you want to associate with the cash receipt.
-
Adjust the Applied column if necessary.
-
Associating a cash receipt to the full value of an RGA will automatically close the RGA. Applying a cash receipt to the partial amount of an RGA will leave the RGA in a Partial Receipt status. The RGA will then be available for use in the future when associating cash receipts or debit memos.
-
Click OK when complete.
Delete a Deposit
You cannot change/update a completed deposit. You cannot void a deposit if it is included in a completed bank reconciliation.
-
Open the Bank Deposits screen (Administration > Accounting > Banking > Search Deposits).
-
Highlight the deposit.
-
Click Delete Deposit.
-
Click Yes on the confirmation message and void the deposit.
-
All associated transactions can be added to new deposits: All transactions and cash drawer sessions associated with the voided deposit are available on Make Deposit/Merchant Card Sweep. This means you add the transactions to a new deposit.
-
What if the deposit has been posted to the GL?: A reversing entry is created.
-
What will you see on the bank reconciliation?: You will see a deposit entry and withdrawal entry for the voided deposit.
Security Permissions Required
| Category | Function |
| Admin-Accounting | *Can Access Accounting Tree Branch |
| BANK - Bank Deposits |
Implications
Accounting
| Transaction Status | Debit | Credit |
| General Cash/Check Deposits | Bank Account | Cash on Hand |
| Other Type Deposits | Bank Account | User Selected Account |
| Change Cash/Check amount (OVER) | Cash On Hand | Over/Under |
| Change Cash/Check amount (UNDER) | Over/Under | Cash on Hand |
Related Reports
- Cash Drawer Activity (Administration > Reports > Accounting > Banking > Cash Drawer Activity Report): Detailed view of customer payments made for a specific date range.
Related Video Content: