Use the Merchants screen to create and maintain merchant profiles. A merchant bank profile is a record that represents the relationship with a credit card processor, and it contains all of your merchant information. For example, merchant id, and connection information.
-
Changes to merchant profiles are saved in the audit log. The audit log is updated when changes are made to a merchant profile. To view the audit log, click the Audit Log button on the Merchant screen (Administration > Evosus Card Services > General Setup > Merchant Profiles). NOTE: please, do not change any merchant profiles! The merchant profile information is maintained by Evosus and OpenEdge Global Payments. If you change any of the information on this screen, you might not be able to process credit card payments.
The merchant profile with ID #1 is actually read-only. That means it cannot be changed after it has been saved.
Create a new merchant profile
- Click Add on the Merchants screen
a. Open the Merchants screen (Administration > Evosus Card Services > General Setup).
-
The Merchants screen displays all credit card merchant profiles that have already been created.
-
Audit Log: The audit log is updated any time a change is made to a merchant profile.
b. Click Add. The Merchant Profile screen appears.
- Fill in the basic merchant information

-
Merchant Name: Enter the name of the merchant profile.
-
Merchant ID: Input your merchant ID.
-
Platform: Select Global Payments (Edge) if you are using OpenEdge Global Payments.
-
XWeb Portal Logon/MSC Logon: User account used to log into the merchant portal.
-
Order Prefix: Enter a three digit number. This number must be unique for each merchant profile. You cannot change this field once you click Save & Continue.
-
Account Token: The account token is a unique number that identifies your account. This number is provided by OpenEdge.
- Complete the OpenEdge information (only if using OpenEdge)
a. The Edge Platform section is only enabled when Global Payments (Edge) is selected in the Platform field.
-
Spec Version: Do not change the value in this field unless instructed to do so by OpenEdge or Evosus.
-
Click Default to restore the default value of XWeb 3.6.
-
XWeb ID, Auth Key, Terminal ID: These numbers are supplied by OpenEdge.
-
Language: Enter ENGLISH.
-
Market Type: Select the market the merchant account serves. Sometimes this is also referred to as industry type. The selected market type must match the market type on your merchant account.
-
Use Test Gateway: Do not check this box.
-
Phone Auth Merchant ID: Enter the merchant ID used for phone authorization transactions.
-
Bank ID/No.: This field defaults to 025600 because it applies to all merchant accounts with OpenEdge.
-
CA Credit TID, CA DEBIT TID, Is Canada/Interac: Only complete these fields if you are a Canadian client using Evosus Card Services.
-
Canada/Interact requires a token to be set up on each terminal. In the US, a token is generally only required for each location.
Check the Is Canada/Interac box and then enter a CA Credit TID, and CA Debit TID. This is the terminal ID for debit and credit transactions.
- Complete and save the merchant profile
-
Phone Authorization Number: When using OpenEdge, there is only one authorization phone number.
-
Auto Settle Daily At: Enter the time when you want to automatically settle payments.
-
Click Save & Continue when complete to save the merchant profile.
- (OpenEdge only) Test merchant profile
- (OpenEdge only) Map stores to the merchant profile
a. Check the box next to each store that should use the new merchant profile.
- Canada/Interac: When setting up Canada/Interac, this tab displays all of the cash drawers grouped by store. Select the cash drawer to map to the merchant profile.
b. The Use OpenEdge Card Services system parameter is set box is checked if you entered Yes in the Use OpenEdge Card Services parameter on the System Parameters screen (Administration > System > Evosus Defaults > System Parameters > Evosus Card Services tab).
-
If this is an OpenEdge merchant account, this box must be checked.
-
This box only displays the selection in the Use OpenEdge Card Services parameter. You cannot set the value in this parameter using this box.
c. Click Close.
- (OpenEdge Only) Test the RCM/Terminal
Once the merchant profile is set up, use the Test RCM/Terminal option to verify the workstation that you are logged into can be used to accept credit card payments.
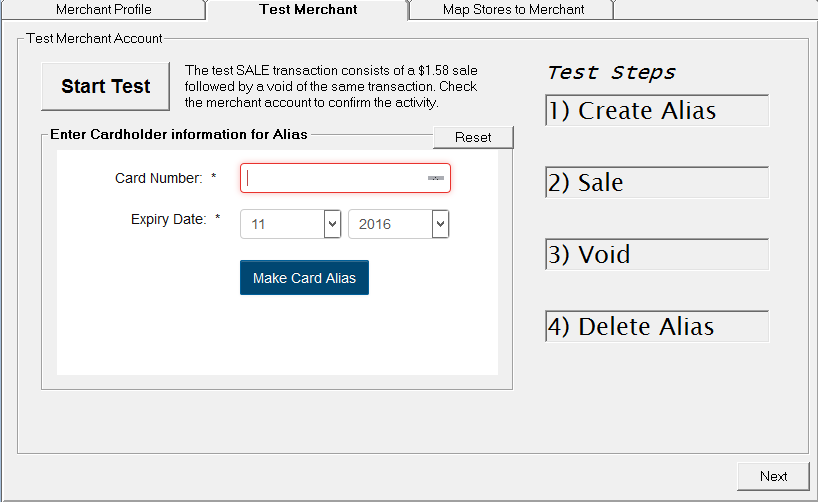
Using the Test Merchant tab to test the Account Token & Auth Key of the merchant profile
-
Open the Test Merchant tab.
-
This tab automatically opens after clicking Save & Continue on the Merchant Profile tab.
-
Click Start Test.
-
Enter the Card Number and Expiration Date.
-
The test transaction is created and voided. You can use a credit card or a debit card.
-
Click Make Card Alias.
-
The progress of the test appears in the Test Steps section.
-
Click Next
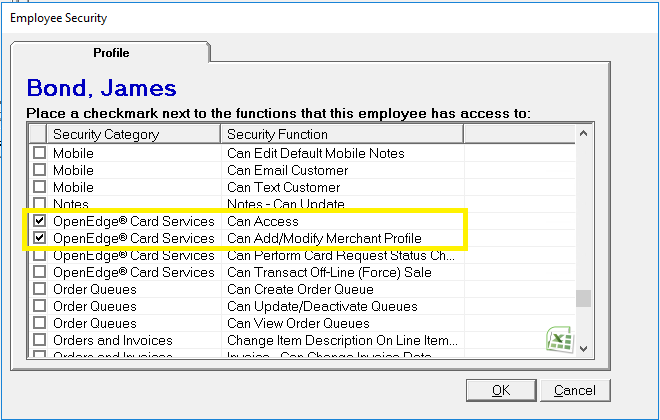
Security Permissions Required