
Part of doing business includes dealing with the occasional “bounced” check from a customer.
What You Need to Get Started
Before you can process an NSF check you need to confirm that you have statement charge reasons set up for NSF checks. Statement charge reasons are set up in Administration > Accounting > General Setup > Statement Charge Reasons. 
Required Statement Charge Reasons
-
NSF Chargeback to Customer: The amount of the returned check before fees are assessed. This Statement Charge Reason is typically assigned to the "Refunds" General Ledger revenue account.
-
NSF Bank Service Charges: The fee the bank is assessing to you for processing the customer’s returned check. Typically, this General Ledger account assignment is typically the same expense account you use when recording bank fees through the bank reconciliation process.
-
NSF Admin Processing Fees: This is an optional account that you will use for any in-house processing fees you will assess the customer in addition to the Bank Service Charges. These fees should be assigned to a revenue account.
What You Need To Do:
-
Record refund to remove check amount in the bank register
- Create an unassociated check refund of the NSF amount. This removes the money from your bank register and your bank reconciliation so the net effect is zero.
- Open the Customer Profile, click Payment/Refunds on the left vertical menu, and then click the Refund button at the top of the screen.

-
Type in the Refund amount, which is the amount of the NSF check.

-
Select Check for the Method.
-
Enter NSF Check in the Check Number field.
-
Select the “Back Office” Cash Drawer if you have one.
-
Click the Save Refund button.
-
You will get a message letting you know that the refund has not been applied to any transactions. Do you want to continue? Click Yes, then OK when the next message pops up letting you know your refund is complete.
-
Once this is completed, there will be a “check” in the Print Checks Queue. You can just remove it from the print queue, or print it out on plain paper if you want to.
-
Add a statement charge for the original invoiced amount and applicable fees
-
Add Statement Charges to the customer’s account for the check amount.
-
Go back to the Customer Profile and select Statement Charges from the left vertical menu.

-
Click on the Add button at the top.
-
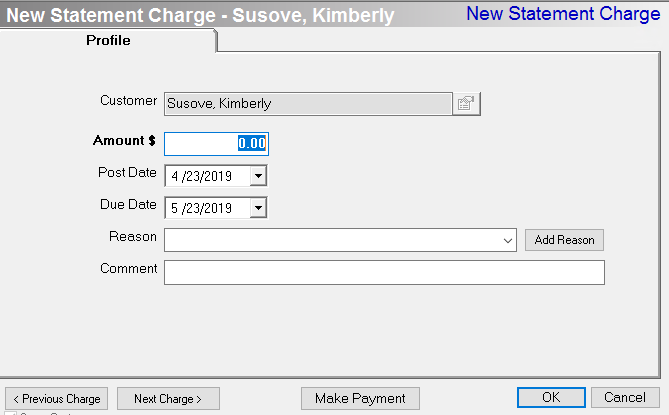
On the New Statement Charge screen type in the amount of the NSF check in the Amount field.
-
Post Date defaults to the current date. The Due Date defaults to 30 days, but you can select your own Due Date if necessary.
-
Reason: select NSF Chargeback to Customer.
-
Record any comments in the Comments section.
-
Add additional statement charges for bank fees and your own processing fees by clicking the Next Charge button. Add your charges using the appropriate Reason Codes, then click OK.
-
Print a statement for the customer
-
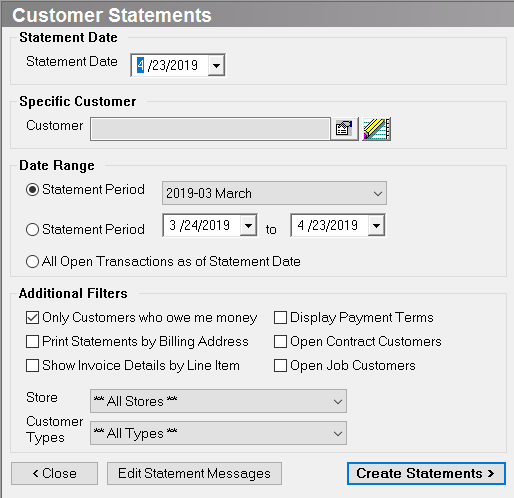
Go to Administration > Accounting > Accounts Receivable > Customer Statements.
-
Statement Date defaults to the current date. You can change this if necessary.
-
Specific Customer: click the search button to the right of the Customer field to locate your customer. Double click on the customer name to add to the Customer search field.
-
Date Range: select a Statement Period, or select All Open Transactions as of Statement Date, then click Create Statements.
-
On the next screen, the option to “Print With Remit Slip” is selected by default. You can leave this or deselect if you just want the statement with no remit slip.
-
Click the “Statement” button and Print To Screen to preview your statement, or Print To Printer to send directly to the printer. There is also an option to print to PDF or to Email the statement. You may want to send via regular mail so you can enclose a copy of the bank notice.
-
If bank redeposits and the NSF check clears
-
If the bank re-deposits the NSF check and it clears the second time, but they still assess returned check fees to you, you can create a statement to the customer for the Bank NSF fees using your NSF Fee reason as listed in Step 3: Print a statement for the customer.
-
Recording Payment on the Statement Charges, Complete the following steps when the customer sends you the replacement money.
-
Open the customer.
-
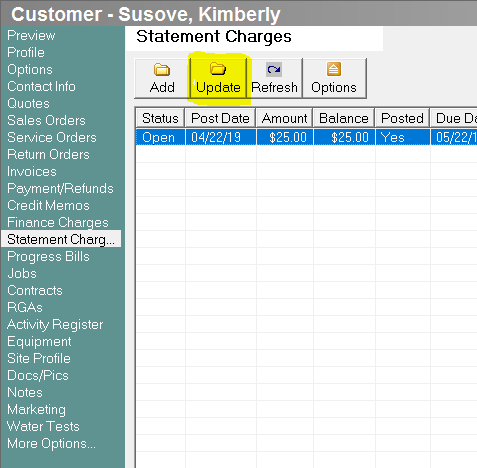
Go to the Customer Profile and select the Statement Charges Tab.
-
Highlight the statement charge and click update.
-
Click "Make Payment" to add a payment to the statement charge.

-
We recommend that you select your Back Office Cash Drawer and do this deposit as a single transaction deposit. Be sure to enter a comment in the deposit section referencing this as an NSF repayment. By doing it this way, you will have an entry in your bank register and on your bank reconciliation that will be easy to identify.
-
Post to the General Ledger
-
Go to Accounting > Accounting Desk > Initiate Posting Process

Writing Off Unpaid NSF Balances to Bad Debt
If the customer fails to cover the NSF check and associated Bank Fees, you can write off the amount as a Bad Debt. The following steps will close the Statement Charge and write
-
Go to the Customer Profile and select "Statement Charges" from the left vertical menu.
-
Locate the Statement Charge for the NSF amount and click on it once to highlight.
-
Click the Options button, select Force Close, and click Yes to confirm.
-
Next you will be asked to "Enter Reason For Voiding Statement Charge". Enter areas on and click OK.
-
Now the Statement Charge you just closed shows "Cancelled" status.
Related Reports
-
Accounts Receivable Aging (Administration > Reports > Accounting > Accounts Receivable > Accounts Receivable Aging): View all customers with an outstanding balance as of a specific date. The report shows days past due and the amount owed.
-
Bank Register (Administration > Accounting > Banking > Bank Register): View all Transactions affecting a bank account and whether they are cleared or not.
-
General Ledger Report (Administration > Accounting > Accounting Desk > General Ledger): This report allows you to view all posted transactions for a time frame. The report can be filtered by specific general ledger account, journal, store and account type. Output can be displayed by account or in posting sequence. The posting sequence report is nice since it groups all postings for a particular transaction together, such as a sales invoice or POS transaction.