
Point reward programs allow customers to accrue points based on purchases and then receive rewards when an award level is reached or the program ends. You can also assign loyalty cards to customer accounts so that employees can scan the card at POS and pull up the customer’s account. Depending on how you set up the point reward program, the points are awarded on the invoice, or when the invoice is paid in full. Here are some examples of points reward programs that you can create
-
Recurring – Points accrue until an award level of 250 points is reached. Once that level is reached, the customer is given a credit memo for $25 that expires in 30 days if it is not used.
-
Program End – Points accrue throughout an entire calendar year. On December 31st, customers are placed into special pricing groups based on the award level they reached. The discount/special pricing will be in effect for a period of time that you determine, such as the following calendar year. For instance, customers that reached 500 points will receive a 10% discount the following calendar year, customers that reach 750 points will receive a 15% discount and customers that reached 1000 points will receive a 20% discount.
Before creating a point rewards program in your live database, you should set up the program in your test database to verify that the program is set up correctly.
Step 1: Create a point program type
The point program type determines schedule type (award recurring or award at program end), and what event triggers point accrual.
-
Open the Point Program Type Search screen (Administration > Sales > Point Rewards > Point Program Types).
-
Click Add. The Point Program Types Update screen appears.

- Name - Input the name of the program type. This is the name of the point program type, not the name of the point rewards program. D. Schedule Type - Select the type of program you want to create.
- Award Recurring: Points accrue until a specific award level is reached, and then the customer is granted the award. For example, points accrue until an award level of 250 points is reached. Once that level is reached, the customer is given a credit memo for $25 that expires in 30 days if it is not used.
- Award At Program End: Points accrue throughout a defined period of time. When the program ends, the customer is granted the award. For example, points accrue throughout an entire calendar year. On December 31st, customers are placed into special pricing groups based on the award level they reached. The discount/special pricing will be in effect for a period of time that you determine, such as the following calendar year. For instance, customers that reached 500 points will receive a 10% discount the following calendar year, customers that reach 750 points will receive a 15% discount and customers that reached 1000 points will receive a 20% discount.
- Accrue Event - Select when a customer should accrue points: on the invoice, or when the invoice is paid in full.
- Accrue for Cash Equivalent Only - Check this box if the invoice must be paid in full using a cash equivalent: cash, check, or credit card. Payment by account credit would not accrue points for the customer.
- Comments - This is an optional field.
- Click 'OK'. The point program type has been created. Now you can create the new point reward program.
Step 2: (optional) Create a credit memo reason
If the point rewards program that you want to create will award credits to customers, we recommend that you create a credit memo reason that will only be used for credits created by the point rewards program.
Step 3: (optional) Set up event notification
If you want to send coupons to customers instead of giving account credits, add the employees that should be notified when customers receive a specific award to the Point Program - Award earned event on the Event-Notify Maintenance screen (Administration > System > Miscellaneous > Evosus Notification). This event will be added to the point rewards program in the next step. See Evosus Notification for more detailed information.
Step 4: Create the point rewards program
You can have as many active point rewards programs as you want, but a customer can only be enrolled in one point rewards program at a time.
-
Open the Point Rewards screen (Administration > Sales > Point Rewards > Point Rewards Manager).
-
Click Add. The New Point Program screen appears.
-
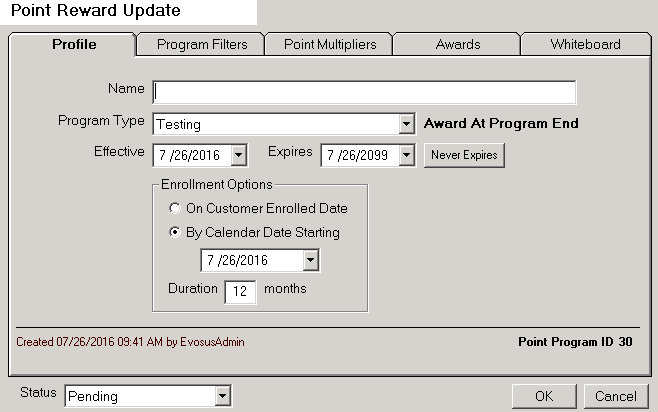
Input the name of the new point rewards program and click 'OK'. The Point Reward Update screen appears.
-
Program Type - Select the program type that you created in Step 1: Create a point program type.
-
Effective - Select the date that customers are eligible to be enrolled in the program. This field defaults to the current date.
-
Expires - Select the date the program ends, or click Never Expires.
-
Complete the Profile tab. These fields only appear if you selected an Award Recurring program in the Program Type field.
-
Grace period days: The number of days after an accrual event (for example, invoicing) before the points are earned and included in the point balance. Points are pending until the grace period has passed. For example, if the grace period is 10 days and the Invoice Date is 6/10/2017, the points are pending and not included in the points balance until 6/20/2017.
-
# Days to Expire: The number of days until the points expire if the customer does not earn an award. For example, if you input 90 days in this field and a customer needs 200 points to earn a $10 credit, the customer must earn the 200 points during a 90 day period.

-
-
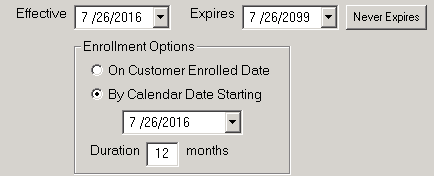
Use the Enrollment Options section to define when customers will start to accrue points and receive rewards. These fields only appear if you selected an Award At Program End program in the Program Type field.
-
On Customer Enrolled Date: Select this option if the customer can start accruing points the day they enroll in the program. When you select this option, customers will also receive rewards on different dates. For example, if Customer A enrolls in the program on 1/1/2017, and Customer B enrolls on 2/15/2017, and the duration of the program is 12 months, Customer A will receive their reward on 1/1/2018 and Customer B will receive their reward on 2/15/2017.
-
By Calendar Date Starting: Select this option if all customers in the program should receive their reward at the same. For example, select this option and input 1/1/2017 if customers should receive their award on 12/31 of every year.
-
Duration: Input the duration of the program in months.
-
-
Complete the program filters
-
Filters determine which customer transactions will accrue points. A program must have at least one filter.

-
Open the Program Filters tab on the Point Reward Filters screen.
-
Click 'Add'. The Point Program Filters screen appears.
-
Name: Input the name of the program filter.
-
Effective, Expires: These fields default to the Effective and Expires fields set up on the program.
-
Whiteboard: Input any notes in this field.
-
Quantity (Qty tab): Use this field to define how many items of a specific product must be purchased before a customer will accrue points. For example, input 10 if only purchases of 10 items or more will accrue points.
-
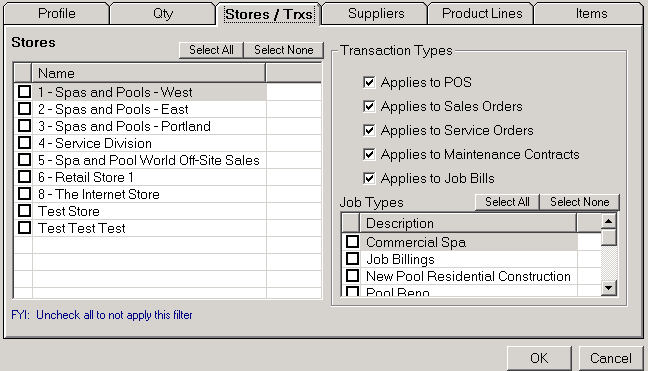
Use the Stores /Transactions tab on the Point Reward Filters screen to filter by stores, transaction types, and job types.
-
Stores - If the program should only apply to a specific store, select that store. Leave all boxes unchecked if the program should apply to all stores. - Transaction Types - Select the transaction types that should accrue reward points. - Job Types - If the program should only apply to a specific job type, select that job type. Leave all boxes unchecked if the program should apply to all job types. This section only applies if you also check the Applies to Job Bills option in the Transaction Types section.
-
-
Use the Suppliers tab on the Point Reward Filters screen to filter by vendor or manufacturer. This is helpful if a specific vendor or manufacturer sponsors your point rewards program, and you only want to accrue points on items from that vendor. Select the vendor/manufacturer from the list that should be included in the program. Leave all of the boxes unchecked if you don't want to filter by vendor or manufacturer (all vendors and manufacturers will be included in the program).
-
Use the Product Lines tab on the Point Reward Filters screen to filter by product line or sub-departments.
-
Product Line - Select a product line if you only want to accrue points for that product line. Leave all boxes unchecked if you don't want to filter by product line (all product lines will be included in the program). - Sub-department - Click the Add Sub-department button to add a sub-department filter to the program.
-
-
Use the Items tab on the Point Reward Filters screen to filter by item types or items. For example, you can use this tab to filter out labor or other item types.
-
Item Types - Select an item type if you only want to accrue points for that item type. Leave all boxes unchecked if you don't want to filter by item type (all item types will be included in the program). - Items - Click the Add Items button to add an item filter to the program.
-
-
Click OK. This closes the Point Program Filters screen and returns you to the Point Reward Update screen.
-
-
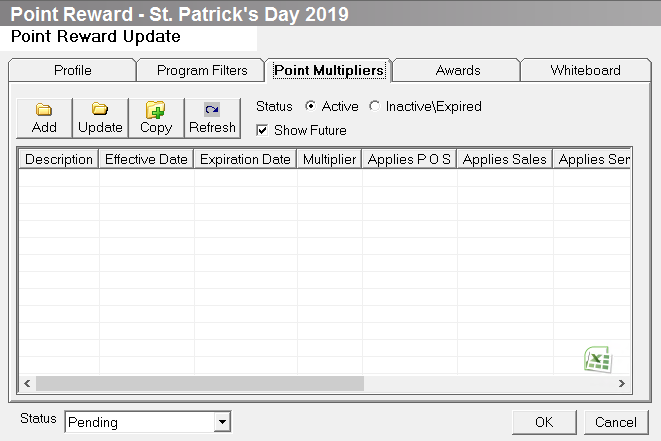
Use the Point Multipliers tab to define how many points accrue with each dollar the customer spends.
-
Open the Point Multipliers tab on the Point Reward Update screen.
-
Click Add. This opens the Point Accrual Multipliers screen.
-
Name: Input the name of the multiplier.
-
Effective / Expires: These fields default to the Effective and Expires fields set up on the program.
-
1 Point: Input the number of points accrued with each dollar that is spent. For example, if you input 5, the customer will accrue 1 point for every $5 that they spend.
-
Transaction Types: Select the transaction types that apply. This allows you to create multipliers that accrue points at different rates. For example, you can create a program wherein stock transactions and sales orders to accrue points at a different rate.
-
Whiteboard: Input any notes on the multiplier in this field.
-
Click OK. This closes the Point Accrual Multipliers screen and returns you to the
-
-
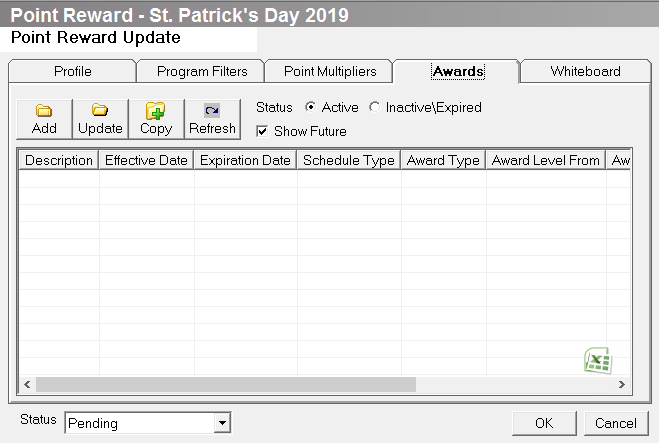
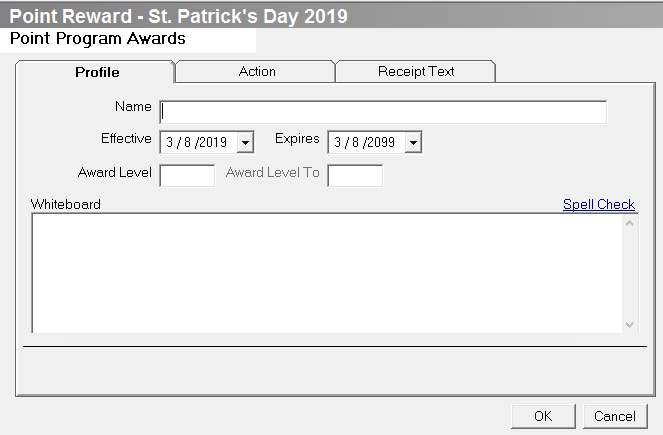
Use the Awards tab to define the award levels and the award that is received. If this is an Award At End of Program, this is where you can create the award tiers. For example, the customer's with between 200 and 350 points get a $20 credit, and customer's with more than 351 points get a $30 credit.
-
Open the Award tab on the Point Reward Update screen.
-
Click Add. The Point Program Awards screen appears.
-
Name - Input the name of the award.
-
Effective / Expires - These fields default to the Effective and Expires fields set up on the program.
-
Award Level (Recurring Program) - Input the point level at which the customer is granted an award.
-
Award Level From / Award Level To (Award At End of Program) - Input the award tier range in these fields. For example, input 200 in the Award Level From field and 350 in the Award Level Tofield if this award should apply to customers that have accrued between 200 and 350 points.
-
Whiteboard - Input any notes in this field.
-
Use the Action tab to define the award the customer will receive.

-
Credit Memo - Check this box if the customer should be awarded a credit memo.
-
Amount - Input the award amount.
-
Expire Days - Input the number of days before the credit memo expires. For example, input 90 if the credit memo should expire after 90 days.
-
Credit Memo Reason - Select a credit memo reason, or click Add Credit Memo Reason to create a new credit memo. We recommend that you create a specific credit memo reason that will only be used for credits created by a point rewards program.
-
Notify - Check this box if a notification should be sent when a customer is granted an award. Select a specific employee from the list, or select Evosus Notification to send a notification to all employees that belong to the Point Program - Award earned event on the Event Notify Maintenance screen (Administration > System > Miscellaneous > Evosus Notification).
-
Price Group - This option is only available on Award At End of Programs. Use this option to add a customer to a specific price group. The price group determines the discount that the customer will receive on specific items. The customer will stay in the price group until they are manually moved, or they are assigned to a different price group by the point rewards program. Only price groups that are set up to be used with a point rewards program will appear in the list.
-
Click 'OK'. This closes the Point Program Awards screen and returns you to the Point Reward Update screen.
-
-
Change the Status of the point rewards program to Open. This means customers can be enrolled in the program. You must have at least one filter, multiplier, and award to change the Status to Open.
-
Click 'OK'.
Step 5: (optional) Mass Enroll Customers
Use the Mass Enroll Customers screen to quickly enroll a large number of customers in a point rewards program (Administration > Sales > Point Rewards > Mass Enroll Customer). For example, use this feature if you want to quickly enroll a group of customers in a new program that you just created. A customer can only belong to one point rewards program. If a customer is already enrolled in a program, you can transfer the customer to a new program. Transferring a customer to another program does the following:
-
Clears the existing points (the points are not transferred to the new point rewards program)
-
Creates a note on the customer that includes the points before the transfer
Follow the steps below to add a new program to a large group of users.
-
Open the Mass Enroll Customers screen (Administration > Sales > Point Rewards > Mass Enroll Customer).
-
Enter the customer filter criteria in the fields at the top of the screen. For example, the screenshot below is including all Commercial customers that are not currently enrolled in a program, and have made a purchase in the last two months.

- Click Refresh. The customers that match the search criteria appear in the lower portion of the screen.
- Select the customers that you want to enroll in the point rewards program. To select a range of customers, hold down SHIFT and click on the first and last customer in the range. To select specific customers, hold down CTRL and click on each customer.
- Select the program in the New Point Program field.
- (optional) The Close current enrollment (if any) first box only applies if a selected customer is already enrolled in a point rewards program. Check this box if all of the selected customers should be removed from any program that they are already enrolled in, and then enrolled in the selected program. If you leave this box checked and you select customers that are already enrolled in a program, every one of those customers will trigger a message giving you the option of closing the current enrollment. For example, if you select 200 customers that are already enrolled in a point rewards program, the message will appear 200 times.
- Click Enroll selected Customers into the new Program.
How do you send your customers a mass email outlining their balances at the end of the year?
Option 1: Action Items - You can setup your Points Reward Award to create a credit memo AND send an action item to an employee. When the employee receives the action item, simply have them notify the customer by phone or email or the award. The action item will not include the customer's email address so the employee must look each account up (this could be time consuming if you have a large client base. To edit your award, open the Points Program and go to the Awards tab. Open the reward and make sure the action item box is checked along with the credit memo.
Option 2: Mail Merge using the Account Credit Liability Report (Administration>Reports>Accounting>Accounts Receivable) - If you have your Points Program setup to use a specific credit memo reason, only used for Points Awards, then you can simply do the following at any recurring pattern (such as weekly, monthly etc.).
Enroll a single customer in a points reward program
A customer can only be enrolled in one points reward program. If a customer is already enrolled in a program, you have to close the current enrollment before you can enroll the customer in a new program. Closing the current enrollment will delete all of the rewards points in that program. For example, if a customer has a balance of 150 points in a recurring program but gets enrolled in a new program, the 150 points will not automatically transfer to the new program. To transfer the 150 points to the new program, you have to make a manual adjustment using the Adjustments tab of the Point Program Manager screen.
- Open the Customer tab on the Main Menu.
- Click on the customer. The customer information appears in the Profile section at the top of the screen.

- The
 icon displays if the customer is already enrolled in a program, and the
  icon displays if the customer is not enrolled in a program.
 - Click the
 or
or  icon. The Point Program Manager screen appears.
 - (if a customer already enrolled in a program) Open the Adjustments tab. The Points field displays the balance of the current points reward program. Remember this balance if you want to make an adjustment after you add the customer to the new program.
-
In the 'Enroll Into Section', select the points reward program in the Program field.
-
Check the 'Close Current Enrollment' box if the customer is already enrolled in a program.
- Click 'Enroll'. A message appears.
- Click 'OK'. This opens the Cards tab of the Point Program Manager screen.
- (optional) Use the Cards tab on the Point Program Manager screen to assign a loyalty card to a customer account. Employees can then scan the loyalty card to pull up the customer account.
- Scan the loyalty card. The card number appears in the Card Number field.
- Click Add. This adds the loyalty card to the customer account.
- If necessary, repeat the steps above to add additional loyalty cards to the customer account. For example, if a customer loses their loyalty card, you can just add an additional card to the account.
- (optional) Use the Adjustments tab to transfer the points of a previous program to the new program.
- Open the Adjustments tab on the Point Program Manager screen.
- Input the previous points in the New Balance field and click Set.
- The new balance appears in the Points field.
- The customer is now enrolled in a points reward program. As the customer makes purchases, the balance on the points reward program appears on the Preview tab of the Customer screen (Customer > Double click on a customer).
Manually adjust a customer's reward points Use the Adjustments tab on the Point Program Manager screen to adjust the balance of a points reward program. For example, this can be helpful if you've offered to increase the customer's balance to satisfy a customer complaint.
-
Open the Customer tab on the Main Menu.
-
Click on the customer. The customer information appears in the Profile section at the top of the screen.
-
Click the
icon. The Point Program Manager screen appears.
-
Open the Cards tab.
-
Scan the loyalty card. The card number appears in the Card Number field.
-
Click 'Add'. This adds the loyalty card to the customer account.
-
If necessary, repeat the steps above to add additional loyalty cards to the customer account. For example, if a customer loses their loyalty card, you can just add an additional card to the account.
What happens when items are returned?
For example, assume there is a rewards program where a customer earns $7.50 for each $250 in sales. The customer purchases $500 worth of items and is eligible for $15.00. Then the customer returns items and goes below the level to earn $15.00, but the application does not void that second $7.50 credit memo.
Why doesn't the application void the second credit memo?
The application doesn't know if part of the credit memo was used by the time the return happened, and there is too much room for error. So the application just leaves the credit memo and lets the points go negative. Step 1: You can manually cancel the credit memo to clear it from your customer's account Step 2: You can create a statement charge, with a statement charge code using the same GL code as used in the Credit memo reason code. Step 3: Apply the statement charge to the open credit to close it.
-
One idea you can try is utilizing the grace period feature. For example, you can set the grace period for generating a credit memo for 10 days. For example, If my purchase today generated enough points to award me credit, that credit will hit my account 10 days from now. If I come in on the 4th day to return the item, my points will reduce and the credit memo will not appear on my account on the 10th day.
-
The grace period option could be a useful tool which may resolve a majority of your return issues with credit memos.
How does the application choose which store to associate a point reward created credit memo?
There are four ways the application chooses a store to associate to a point reward created Credit Memo.
Award Recurring Program Type
1. The credit memo will be associated with the store selected in the invoice that pushes the customer over the point reward threshold.
2. Grace Period Exists: The Daemon will initiate the Credit Memo creation, therefore the store associated with the Credit Memo will be the store with the lowest active ID number.
Program End Program Type
3. The Daemon will initiate the Credit Memo creation, therefore the store associated with the Credit Memo will be the store with the lowest active ID number.
4. If the Point Reward Maintenance Process is manually processed through Sales/Utilities/Process Point Reward Maintenance then Credit memo will be associated to the store the user (who is running the process) is logged into at the time.
Remove a large group of customers from a point rewards program
Use the Mass Enroll Customers screen to quickly remove a large number of customers from a point rewards program (Administration > Sales > Point Rewards > Mass Enroll Customer).
-
Open the Mass Enroll Customers screen (Administration > Sales > Point Rewards > Mass Enroll Customer).
- Select the point rewards program in the Point Program field.
- Use additional filters if necessary.
- Select the customers that you want to enroll in the point rewards program. To select a range of customers, hold down SHIFT and click on the first and last customer in the range. To select specific customers, hold down CTRL and click on each customer.
- Click Unenroll selected Customers. This removes the selected customers from their current point rewards program.