
What do you need to know?
You can track both warranty labor and parts through the RGA process. If you receive parts back from the vendor for replacement you will receive those items through the RGA itself. If you receive checks or credit for the items, you will receive them through Vendor Debit Memos (credit) or Bank Deposits (cash). If a vendor does not approve the warranty or reduces the amount requested, update the RGA to reflect those changes. An RGA can be closed even if all the inventory items, cash or credit have not been received.
There are two types of RGAs
- Auto-Created: An RGA is automatically created when an item is marked as Warranty on a Sales Order, Service Order or POS Sales Transaction. The auto-creation of an RGA will not deplete your inventory, quantity on hand is not necessary for RGA to send.
- Manual: A manual RGA is typically created when you receive damaged goods from the vendor and/or need to return an item. It is not related to a customer transaction. The items on the RGA are removed from stock when the RGA is sent to the vendor.
Process a Manual RGA:
Part A - Use Add RGA to manually create the new RGA
Step 1: Open the New Return Goods Authorization screen (Administration > Inventory > Return Goods Authorizations > Add RGA).
Step 2: Enter the tag number
Step 3: Enter the vendor RGA number given to you by the vendor/manufacturer or another identifying name or number. This number will be the tracking ID number.
Step 4: Click Next.
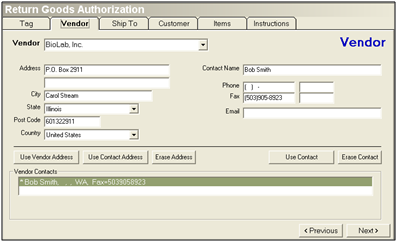
Step 5: Enter the vendor information
-
Select a Vendor from the pull-down menu or simply type in the name of the vendor. All available information on the Vendor will populate in the fields on the tab.
-
You may add or change any information as necessary. Any changes to the Vendor information on the RGA will not be permanently recorded in the Vendor Profile. The information is specific to the RGA where it was entered
-
A list of available contact addresses for the Vendor is listed at the bottom of the screen. To use a contact address, highlight the address in the lower portion of the screen and click Use Contact Address.
-
To revert back to the original Vendor Address, click Use Vendor Address. Click Erase Address to erase all address information and type in a new address.
-
Click Erase Contact to erase all contact information and add a new name, phone, and email address.
-
Click Next.
-
Select the ship to

-
The Ship to Tab contains your company’s default shipping stock site and address. This information is important if you expect to receive inventory back from the Vendor.
-
If you need to change the stock site, select a new stock site from the pull-down menu and the all available address information will populate for you. You may also enter a new address if necessary.
-
Click Next.
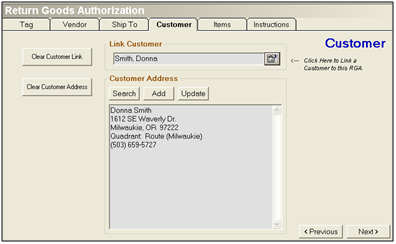
Step 6: Select the customer
-
If necessary, select a customer to associate to the RGA. Click the Search button and select a customer. NOTE: If a customer must be associated with an RGA, the best practice procedure would be to create a Sales, Service or POS order for the customer with the warranty items marked as warranty. This will record that you gave the customer an item for free (under warranty) and that you expect to receive inventory, money or a credit in return for the warranty item. An RGA is automatically created for you and the customer is automatically associated with the order.
-
Click Next.
Step 7: Add items to the RGA

Step 8: Add items to the RGA.
-
Enter Our Item Code or click
 to select an inventory item from a list.
 -
Enter the item Quantity. By default, the application uses the unit of measure on the selected vendor. You can change the unit of measure after the item is added to the RGA.
-
Click Add Item.
-
Labor can be included as a warranty item. Cash or credit will be received for these items rather than a physical inventory item.
Step 9: Update the items. For example, change the item quantity or unit of measure.
-
Double click on an item to update the item information.
-
Unit of Measure: Defaults to the unit of measure on the selected vendor, but you can change this field if necessary. For example, if you receive items from the vendor in cases of 12 but sell the items individually, you can create an RGA for two damaged units instead of the entire case of 12.
-
Unit Price: Use this field to override the unit price of the item on this RGA. This does not change the inventory item information.
-
Comment: Enter a comment for this RGA item.
-
Expected: Check this box and then select the expected date. By default, this is the current date.
Step 10: Enter any applicable shipping costs to the RGA. These are the costs that you will be charging to the vendor.
-
Highlight an item and click Delete to remove an item from the RGA.
-
Click Next.
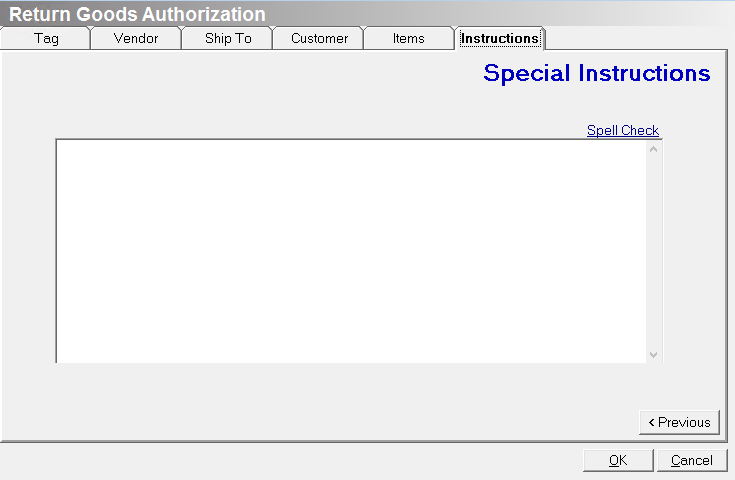
Step 11: Enter any special instructions and create the RGA
-
Enter any special instructions you may have for the Vendor. These notes will print on the RGA. Click OK to save the RGA. The RGA is now sitting in an Open Status in the Search RGAs queue. You may send, print, update or cancel the RGA.
Step 12: Send the RGA
-
Once the RGA is created, send the RGA and change the status to Send. You can do this using the Search RGAs screen (Administration > Inventory > Return Goods Authorization > Search RGAs).
PART B – Send RGA to vendor/manufacturer
When you send the RGA to the vendor/manufacturer, the items on the RGA are removed from inventory.
Step 1: Go to Administration > Inventory > Return Goods Authorizations > Search RGAs.
Step 2: Right-click on the RGA and select Change Status - Send.
Step 3: Click ‘Yes’ on the confirmation screen that appears.
Step 4: A journal entry is created.
PART C – Receive and close the RGA
RGA reimbursement can be in the form of inventory, cash, or credit. You do not have to be reimbursed by the Vendor to close the RGA. If the Vendor is not going to reimburse your company, you may close the RGA with a balance still due.
There are three ways to receive and close an RGA:
Option 1: Receive replacement inventory from the vendor - You can only receive inventory items on an RGA item with a status of Sent.
Step 1: Open the Return Goods Authorization Search screen (Administration > Inventory > Return Goods Authorizations > Search RGAs)
Step 2: Use the filters to locate the RGA you want to receive.
Step 3: Right-click on the RGA and select Receive Inventory from the menu that appears.
-
The Receive Inventory option is only enabled if the status of the RGA is Sent.
-
To change the status of an RGA to Sent, right click on the RGA and select Change Status - Send from the menu that appears.
Step 4: Highlight the RGA item that you are receiving.
Step 5: Click Add Receipt. The Receive Inventory from RGA screen appears.
Step 6: Enter the receipt.
-
What type did you receive?: The Inventory Item option is automatically selected.
-
Item Quantity: Enter the quantity received.
-
Stock Site: The inventory is added to this selected stock site.
-
Comment (optional): Add any additional comments relating to the receipt of this item.
Step 7: Click OK.
-
Repeat the steps above to receive more RGA items
The following posting will occur when STOCK items are received on an RGA:
|
Debit |
Credit |
|
Default Inventory asset account for the stock site associated with the RGA |
Accounts Receivable |
The following posting will occur when NON-STOCK items are received on an RGA:
|
Debit |
Credit |
|
Default COGS account for the product line associated with the item. |
Accounts Receivable |
Option 2: Receive credit from the vendor
Step 1: Go to Administration > Accounting > Accounts Payable > Add Debit Memo.
Step 2: Checkbox “Is for RGA.”
Step 3: Click ‘Yes’ to associate receipt to RGA when prompted.
The following posting will occur when credit is received from the vendor, regardless of Item Type:
|
Debit |
Credit |
|
Accounts Payable |
Accounts Receivable |
Marking an RGA as “Sent” posts a debit to Accounts Receivable, so receiving vendor credit for the RGA posts the offsetting credit to the Accounts Receivable account. Receiving credit from the vendor means you create a Debit Memo in Evosus and associate it to the RGA using the “Is for RGA” checkbox. The above posting would then occur.
Option 3: Receive cash or check from the vendor
Step 1: Go to Administration > Accounting > Banking > Make Deposits.
Step 2: On the Other Cash and Checks deposits screen, enter the check information and check the “Is for RGA” box.
Step 3: Click ‘Yes’ to associate receipt to RGA when prompted.
The following posting will occur when cash or check is received from the vendor, regardless of Item Type:
|
Debit |
Credit |
|
Bank Account |
Accounts Receivable |
-
Marking an RGA as “Sent” posts a debit to Accounts Receivable, so receiving cash or check for the RGA posts the offsetting credit to the Accounts Receivable account.
-
Receiving cash or check from the vendor means you create an “Other” type bank deposit in Evosus and associate it to the RGA using the “Is for RGA” checkbox. The above posting would then occur.
Related Video Content:
Item Management - Stock Sites, Serial Numbers, RGAs and Kits