
This article reviews how to record customer payments in Evosus, both as individual payments or in a batch.
What GL accounts are used?
The AR Discount, and Finance Fee posting account is determined by the account selected in Accounting Defaults (Administration > Accounting > General Setup > Accounting Defaults).
Process a batch of customer payments
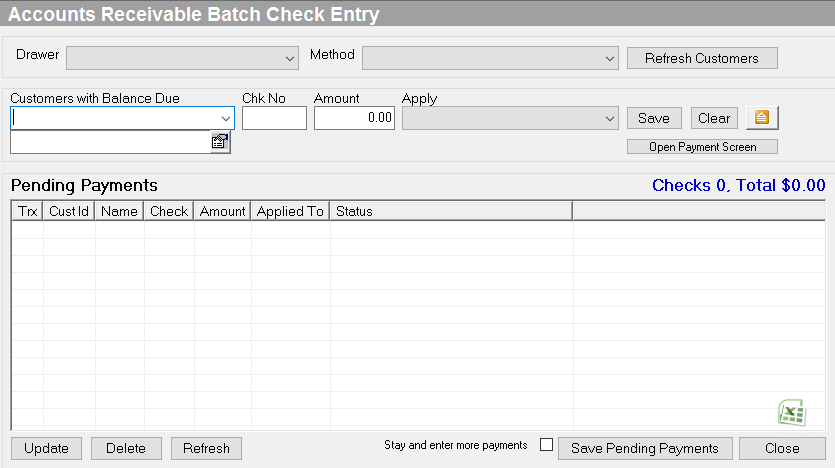
Use the Accounts Receivable Batch Check Entry screen to quickly enter a large quantity of accounts receivable check payments (Administration > Accounting > Accounts Receivable > Receive Check Payments in Batch). All checks can be entered from a single screen rather than selecting each customer and making individual payments. All payments are listed and totaled on the screen so you can easily verify the number and total of payments entered before permanently saving to the database.
-
Go to Administration > Accounting > Accounts Receivable > Receive Check Payments in Batch.
-
Select a Cash Drawer.
-
Cash drawers are added to stores using the Cash Drawers tab on the Store screen (Administration > System > Stores > Stores).
-
Select a Payment Method. Only Check payment types are available.
-
Select a customer.
-
Quickly select a customer with a balance due by last name: Type the customer's last name in the Customers with Balance Due field and the system automatically selects the customer.
-
Select a customer that does not have a balance due: Use the Search () field to select a customer that is not in the list. Entering a payment for a customer without a balance due will create an unapplied payment (credit memo) on their account.
-
Enter the Check Number.
-
Enter the Payment Amount.
-
Select an option in the Apply field.
-
Auto Apply: Applies the payment from the oldest transaction to the newest transaction.
-
Apply payment to a specific transaction: Select a specific transaction in the drop-down menu.
-
Manually apply the payment to multiple transactions: Click Open Payment Screen to manually apply the payment to multiple transactions. This will open the Payments screen and immediately save the payment. The payment will still be listed in the Pending Payments grid, but it will have a Status of Saved.
-
Click Save.
-
Repeat the steps above to enter additional customer payments.
-
Verify the total number of checks and total dollar amount is correct.
-
You can update and delete the payments listed in the screen until you click Save Pending Payments.
-
Stay and enter more payments: Check this box if you are entering multiple batches. This leaves the Account Receivable Batch Check Entry screen open you click the Save Pending Payments button.
-
Click Save Pending Payments to complete the batch.
Security Permissions Required
| Category | Function |
| Admin-Marketing | Can Access ACCOUNTING Tree Branch |
Record a single customer payment
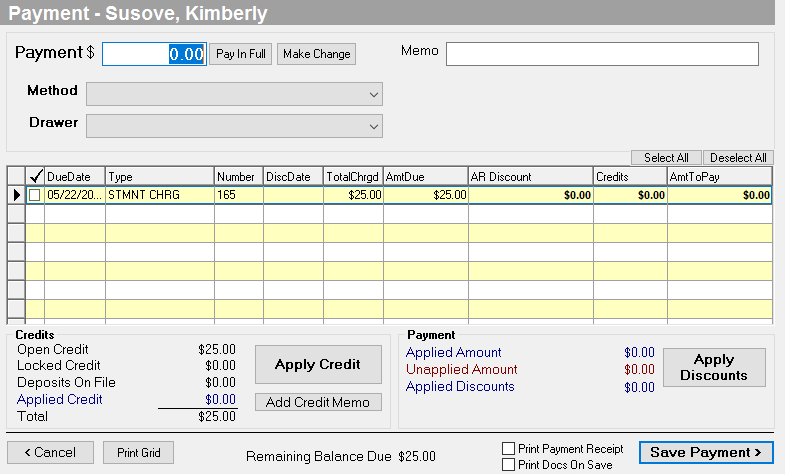
Use the Payments screen to apply payments, credits, finance fees, and AR Discounts for Orders, Invoices, statement charges and/or finance charges (Administration > Accounting > Accounts Receivable > Receive Customer Payment). Generally, the Payments screen is used when a payment is received over the phone or in the mail.
- Open the Payment screen (Customer > Open a customer > Payment/Refunds tab > Payments button)
-
Enter the Payment amount.
-
Pay in Full: Pay for all transactions listed in the grid. This includes all open orders, invoices, statement charges, and finance charges.
-
Method: Select a payment method.
-
Check: If you select Check, enter a check number before saving the payment.
-
Drawer: Select a cash drawer to apply the payment to. The Cash Drawer must be open in order to receive the payment.
-
Apply the payment amount to the transactions.
-
Payment automatically applied: The system automatically applies the payment to the transactions, starting with the oldest to newest invoice, and then finance charges, statement charges, and orders.
-
Manual adjustments: Select the transactions to apply the payment to, and adjust the value in the AmtToPay field. The amount cannot exceed the AmtDue.
-
Apply AR discounts/finance fees.
-
AR discounts are discounts a customer receives for paying before the due date. For example, if the payment terms are 2%10/Net30, the customer receives a 2% discount if they pay within 10 days. There are two way to apply discounts:
a. Manually enter discount: Enter the discount amount in the AR Discount field. You can double click on a transaction to see the original payment terms.
b. Apply discounts (Use this option to apply finance fees): Highlight the transaction you want to apply the AR discount or finance fee to and click Apply Discounts. Enter the AR Discount and click Close.
-
Apply a finance fee: A finance fee is an amount kept by the financing company for processing the customer loan/lease. Enter the total check amount in the Payment field. Select the transaction to apply the finance fee to and click Apply Discounts. Enter the AR Finance Fee and click Close. The AR finance fee will post to the Finance Fee expense account selected on the Accounting Defaults screen (Administration > Accounting > General Setup > Accounts Receivable tab > Finance Fee (EXPENSE) field). Finance fees can only be applied to invoices, not orders.
-
Apply credits.
-
Credits can come from refunds, unapplied payments, or manual entry by your staff. Credit can be applied to invoices, statement charges, and finance charges. Credits cannot be applied to orders. There are two ways to apply credit:
a. Manually enter credit: Enter the credit amount in the Credits field. The system will automatically apply credit memos to the transactions, starting with the oldest.
b. Apply Credit button: Select a transaction to apply the credit to and click Apply Credit. All available credits and deposits display. Enter the amount to apply in the ApplyAmt field. Click Close when complete. The Credits column displays the applied credits.
-
Add a Credit Memo: Click Add Credit Memo to grant a customer credit.
-
Apply deposits.
-
Generally, deposits are associated with a specific order and automatically applied to the subsequent invoice. But you can apply the deposit to a different transaction
-
Highlight the transaction you wish to apply the Deposit to. Click Apply Credit and locate the Deposit you wish to apply. (Note: Deposits are denoted with Deposit-Order while Credits are denoted with CRM). Enter the amount you wish to apply and click Close.
-
Important: Once you save the payment a message will appear saying “WARNING: Mismatched Deposit”. It is basically saying the deposit was originally associated to one order and now you are removing it from that order and applying it to a different transaction. Are you sure you want to do this? Sometimes this message will appear if you enter an amount directly into the Credit column IF a deposit was next in line to be applied (on the [Apply Credit] screen. Say No to the message if you do not wish to apply the deposit.
-
Print Payment Receipt: Check this box to print a 4” POS type receipt that includes all transactions the payment was applied against.
-
The receipt opens after you click the Save Payment button. You can print or email the generated receipt.
-
Print Docs on Save: Print all related documents such as orders and invoices.
-
Remaining Balance Due: Displays the total of all transactions in the grid that remain unpaid.
-
Verify the Unapplied Amount is zero.
-
There should only be a value in the Unapplied Amount field if the customer overpaid or is not applying the money to any invoices.
-
Payment not entered correctly: Verify the amounts entered in the AmtToPay column are correct. Generally, you want the AmtToPay column total (the Applied Amount) to match the Payment field
-
Customer overpaid: Apply the payment to the available transactions and the remaining Unapplied Amount automatically creates a credit memo. The credit memo can be refunded or used for future transactions.
-
You do not wish to apply the payment to any transactions: Click Save Payment and a credit memo is created for the amount of the payment. The credit memo can be refunded or used for future transactions.
-
Click Save Payment to save the new payment.
Security Permissions Required
| Category | Function |
| Administration – Accounting | *Can Access Accounting Tree Branch |