
You can create recurring transactions for AP invoices, credit card transactions, and journal entries.
To do this, create and save a transaction, and then select the transaction that you just created and click the 'Make Recurring' button on one of the following screens:
-
AP Invoice: New Bill screen (Administration > Accounting > Accounts Payable > Enter Bill)
-
Credit Card Charge: AP Credit Card Charges screen (Administration > Accounting > Accounts Payable > Credit Cards > Add Credit Card Charge)
-
Journal Entry: General Journal Entries screen (Administration > Accounting > Accounting Desk > General Journal Entry > Add button)
a. After you click the Make Recurring button, you schedule the recurrence pattern. The recurrence cannot be edited after it is saved. If you need to change a recurring transaction, you have to deactivate it and create a new recurring transaction.
Use the following screens to view or deactivate recurring transactions:
-
View all recurring transactions: Recurring Transaction (Administration > System > Miscellaneous > Recurring Transactions Search). This screen displays all recurring transaction: AP invoices, credit cards, and journal entries.
-
AP invoices: Recurring Transactions: AP Invoice screen (Administration > Accounting > Accounts Payable > Recurring Bills Search). This screen only displays recurring AP invoices.
-
Credit Card Charges: Recurring Transactions: AP Credit Card Charge screen (Administration > Accounting > Accounts Payable > Credit Cards > Recurring Credit Card Charges Search). This screen only displays recurring credit card charges.
-
Journal Entries: Recurring Transactions: General Journal Entry screen (Administration > Accounting > Accounting Desk > General Journal Entry Search). This screen only displays recurring journal entries.
Search for recurring transactions
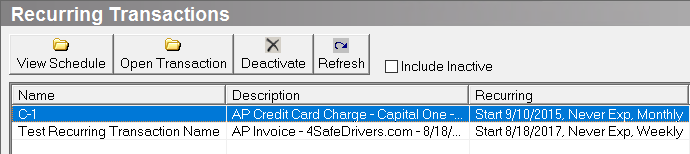
Use the Recurring Transactions screen to see a list of all recurring transactions that have been set up in the system (Administration > System > Miscellaneous > Recurring Transactions Search). This displays all recurring AP invoices, recurring credit card charges, and recurring journal entries.
Create a new recurring bill
- Input and save the bill that will be used as the recurring transaction. For example, if you are going to be billed weekly for window cleaning, input and save the first bill.
- Open the New Bill screen (Administration > Accounting > Accounts Payable > Enter Bill).
- Input the bill and allocate it to the correct GL account.
- Click OK to save the transaction.
- Reopen the bill and click Make Recurring to set up the recurrence schedule
- Open the Search Bills screen (Administration > Accounting > Accounts Payable > Search Bills).
- Double click on the recurring transaction, and then click Make Recurring. The Recurring Transaction screen appears.
- Name: Input the name of the recurring transaction.
- Range of Recurrence: Select the length of time the recurring transaction should occur. You can cancel a recurring transaction at any time using the Recurring Transactions Search screen (Administration > System > Miscellaneous > Recurring Transactions Search).
- Recurrence Pattern: Select how often the transaction should occur. By default, Weekly is selected. If you select Monthly, the Date and Day options depend on the start date that you selected in the Range of Recurrence. For example, if the start date is 9/9 and you set up the transaction to recur monthly and by date, the transaction will recur on the 9th of every month.
- Comment: Input any comments on the recurring transaction.
- Click OK. This creates a recurring transaction.
- Use the Recurring Transactions Search screen to view the recurring transaction
You can use the Recurring Transactions Search screen (Administration > System > Miscellaneous > Recurring Transaction Search) to view or deactivate a recurring AP invoice.
You can also use the Recurring Transaction screen (Administration > System > Miscellaneous > Recurring Transactions Search) to view all recurring transactions: AP invoices, credit cards, and journal entries.
Create a recurring credit card transaction
- Input the charge on the AP Credit Card Charges screen. (Skip this step if the credit card charge has already been entered.)
-
Open the AP Credit Card Charges screen (Administration > Accounting > Accounts Payable > Credit Cards > Add Credit Card Charge).
-
Input the credit card charge information in the Add New Charge section.
-
Click Add Charge.
-
Close the AP Credit Card Charges screen.
-
Open the AP Credit Card Reconciliation screen (Administration > Accounting > Accounts Payable > Credit Cards > Search Credit Card Charges).
-
Double click on the recurring credit card charge. The AP Credit Card Charges screen appears.
-
Click Make Recurring. The Recurring Transaction screen appears.
-
Name: Input the name of the recurring credit card charge.
-
Range of Recurrence: Select the length of time the recurring credit card charge should occur. You can cancel a recurring credit card charge at any time using the Recurring Credit Card Charges Search screen (Administration > Accounting > Accounts Payable > Credit Cards > Recurring Credit Card Charges Search).
-
Recurrence Pattern: Select how often the credit card charge should occur.
-
Comment: Input any comments on the recurring credit card charge.
-
Click OK. This creates the recurring credit card charge.
3. You can use the Recurring Credit Card Charges Search screen (Administration > Accounting > Accounts Payable > Credit Cards > Recurring Credit Card Charges Search) to view or deactivate a recurring credit card charge.
- You can also use the Recurring Transaction screen (Administration > System > Miscellaneous > Recurring Transactions Search) to view all recurring transactions: AP invoices, credit cards, and journal entries.
Create a recurring journal entry
-
Input the new journal entry. Skip this step if the journal entry has already been entered.
-
Open the General Journal Search screen (Administration > Accounting > Accounts Payable > General Journal Entry, or any of the other menu options that launch this screen).
-
Click Add to create a new journal entry. The General Journal Entries screen appears.
-
Input the new journal entry and click OK. This returns you to the General Journal Search screen.
2. Once the journal entry has been created, reopen the entry and set up the recurrence schedule.
-
Open the General Journal Search screen (Administration > Accounting > Accounts Payable > General Journal Entry, or any of the other menu options that launch this screen).
-
Double click on the journal entry. The General Journal Entries screen appears.
-
Click Make Recurring. The Recurring Transaction screen appears.
-
Name: Input the name of the recurring journal entry.
-
Range of Recurrence: Select the length of time the recurring journal entry should occur. You can cancel a recurring journal entry at any time using the Recurring Transactions - General Journal Entry screen (Administration > Accounting > Accounts Payable > General Journal Entry > Recurring Schedule button).
-
Recurrence Pattern: Select how often the journal entry should occur.
-
Comment: Input any comments on the recurring journal entry.
-
Click OK. This creates the recurring journal entry.
3. Use the Recurring Transactions - General Journal Entry screen (Administration > Accounting > Accounts Payable > General Journal Entry > Recurring Schedule button) to view or deactivate a recurring journal entry.
-
You can also use the Recurring Transaction screen (Administration > System > Miscellaneous > Recurring Transactions Search) to view all recurring transactions: AP invoices, credit cards, and journal entries.
Deactivate a recurring transaction
You cannot edit an existing recurring transaction. To change a recurring transaction, you have to deactivate it and then create a new recurring transaction. Deactivating a recurring transaction will not remove a transaction that has already been processed. To cancel a processed transaction, use one of the following: Search Bills (AP invoices), AP Credit Card Reconciliation (credit cards), or General Journal Entry (journal entries).
- Open the Recurring Transaction screen (Administration > System > Miscellaneous > Recurring Transactions Search). This screen displays all of the recurring transactions that have been set up in the system: AP invoices, credit cards, and journal entries.
2. Click on the recurring transaction that you want to deactivate.
3. Click Deactivate.
4. Click Yes on the message that appears.
Related Video Content: