
The chart of accounts is a listing of all the accounts of the company. When you create the chart of accounts, you organize the accounts into a hierarchy. This hierarchy determines how the accounts are organized on Financial Statement Reports.
-
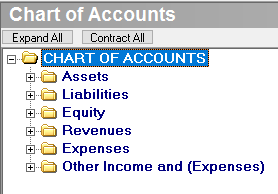
Assets, Liabilities, Equity, Revenue, Expenses, Other Income and (Expenses): These groupings are the highest level of the hierarchy, and cannot be changed.
-
Folders: You can create as many folders as needed below the Assets, Liabilities, Equity, Revenue, Expenses, Other Income and (Expenses) groupings. For example, under the Assets grouping, you can create a Current Assets folder, and inside the Current Assets folder, you can create an Accounts Receivable sub-folder.
-
Account: Once the folders are set up, you add the GL accounts to the folders.
Follow these rules when creating/updating your chart of accounts:
-
Use at least a 4 digit code to make sure you have enough digits by grouping.
-
Always leave room for future accounts by stepping numbers (example: 4002, 4004, 4006, etc)
-
You can change an account code at any time. Transactions will automatically be assigned to the new number.
-
General sub-grouping accounts can be re-assigned to a different Parent Account. Likewise, detail accounts may also be reassigned to a Parent Account as long as it is within the same primary account type (i.e. Assets, Liabilities, etc).
-
Parent Account: An account in the General Ledger from which one or more similar accounts originate
-
Cost of Goods Sold (COGS) accounts can be found under the Expenses account group. By default, Evosus treats the first sub-group under expenses as the grouping for COGS. All groups after that are treated as operating expenses.
-
Cost of Goods Sold (COGS): The cost of inventory items sold to your customers. It may consist of several cost components, such as merchandise purchase costs, freight, and manufacturing costs.
-
Once an account is created, is cannot be deleted. Accounts may be designated "inactive" which removes them from all drop-down screens as if they were deleted.
Create a parent folder
- Open the Chart of Accounts screen (Administration > Accounting > General Setup > Chart of Accounts).
-
Navigate to where you want to create the new folder. For example, if you want to create a new folder in the Assets grouping, open the Assets grouping.
-
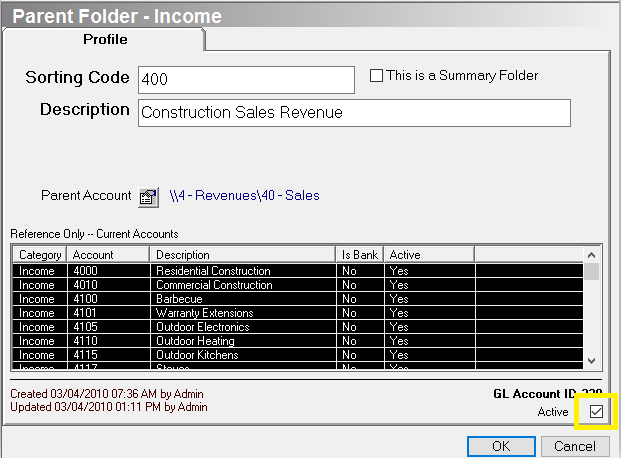
Click Add Parent Folder. The New Parent Folder screen appears.

- Sorting Code: Determines the order that the folder will appear in the chart of accounts and on financial statements.
-
For example, assume that you have two folders inside the Asset grouping: Banking (sorting code = 110) and Inventory (sorting code = 150). If you create a new folder called Accounts Receivable and assign it a sorting code of 130, it will be added to the chart of accounts between the Banking(110) and Inventory(150) folders.
-
Generally, the sorting code is the first three digits of the account numbers that will be put inside the folder. For example, if all of your account numbers in the Banking folder start with 11XX, the sort code would be 110.
- This is a Summary Folder: Check this box if the accounts in this folder should be rolled up into a single line when financial reports are generated in a summary format - for example, if you want all of the cash on hand accounts to be rolled up into a single cash on hand line on the Balance Sheet,
- This only applies when the financial reports are generated in a summary format. For example, check the Summary Statement box when creating an Income Statement (Administration > Accounting > Accounting Desk > Income Statement).
-
Description: Input the name of the folder.
-
Click OK when complete.
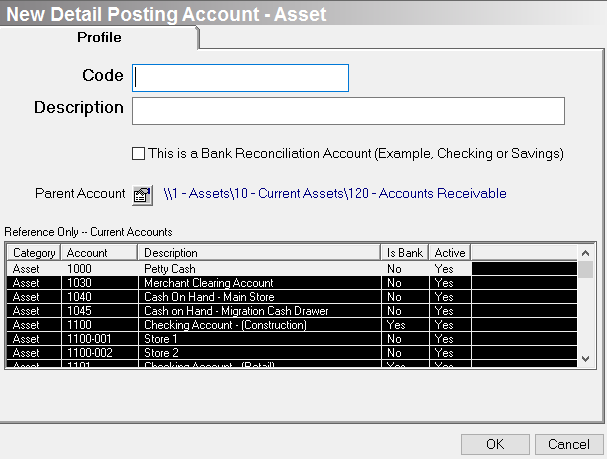
Create a new GL account
You can only create a new GL account in an existing parent folder. For example, if you want to create a new GL account (Assets > Current Assets > Accounts Receivable) the Current Assets and Accounts Receivable folders must already be set up.
- Changes made to the GL account are date driven.
-
Open the Chart of Account screen (Administration > Accounting > General Setup > Chart of Accounts).
-
Navigate to where you want to create the new account: for example, go to Assets > Current Assets > Accounts Receivable if you want to create a new account in the Accounts Receivable folder.
-
Click on Add Detail Posting Account. The New Detail Posting Account screen appears.
-
Code: Input the account number of the new account.
-
The code should be at least a four-digit number.
-
The Current Accounts section displays the GL accounts in the same parent folder. You can use this section to help determine the next available account number.
-
Description: Input a description of the GL account.
-
This is a bank reconciliation...Check this box if this is a bank account that will be reconciled in the application,
-
Parent Account: By default, this field populates with where you navigated in step #2.
-
To select a different location, click
 and then select a new location.
-
Click OK when complete to save the new account.
Move an existing account into a different folder
-
Open the Chart of Account screen (Administration > Accounting > General Setup > Chart of Accounts).
-
Open the account that you want to move. The Detail Posting Account screen appears.
-
Parent Account: Click
 and then select a new location.
 -
Click OK when complete.
Activate/inactivate an account or folder
You can inactivate an account or an entire folder.
Things to consider when inactivating an account:
-
Accounts with a balance should not be inactivated. Create the necessary journal entries to zero the account to be deactivated. The Current Balance of an account displays at the top of the Detail Posting Account screen (Administration> Accounting > General Setup > Chart of Accounts > Open an account).
-
Evosus software does not allow inactivation of accounts used in the Accounting Defaults Setup or Inventory Tree.
-
You can inactivate accounts with activity (except those mentioned above) and they will still appear in the current year reports as applicable.
Things to consider when inactivating a folder:
You need to remove all of the accounts from the folder before inactivating it.
-
Open the Chart of Account screen (Administration> Accounting > General Setup > Chart of Accounts).
-
Double click on the account or folder.
-
Activate/inactivate the account/folder.
-
Active: This box displays if the account/folder is active. Uncheck this box to inactivate the account/folder.
-
Inactive: This box displays if the account has been inactivated. Check this box to activate the account/folder.
- Click OK.
Related Video Content:
Why is it important to consider your product lines when building your chart of accounts?
Why is it important to consider your stock sites, cash on hand accounts, and payroll accounts when building your chart of accounts?