
Use the Update Cost on Existing Inventory option to quickly update the purchase cost of the inventory items in your database that you purchase from the vendor. For example, use this option to update the purchase cost of the items that you purchase. The application checks your item code, vendor item code, and item alias to locate items to update. For example, the item code must match exactly in order for the application to consider it a match. For instance, C4950 will NOT match C-4950. If an item is discontinued, you can also use this option to automatically check the Is Clearance and Auto-Mark "Do Not Sell" when Inventory depleted boxes on the Options tab of the Item screen (Inventory > Open an item > Options tab) This means the inventory item is marked as Do Not Sell once the inventory is depleted.
Integration Partners that Support This Feature:
|
Baystate |
POOLCORP |
Keller |
Carecraft |
|
Optimus |
United Aqua Group |
Watkins |
Cinderella |
|
Carecraft IPG |
Horizon |
Crik-IT |
|
Update Cost on Existing Inventory
The integration must be set up before you can use this feature.
- Open the Mass Update Pricing screen (Administration > Industry Integrations > Update Cost on Existing Inventory).
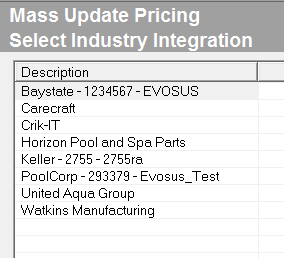
- Select the integration that you want to use and click Next. For example, if you want to update the cost of PoolCorp items, select the PoolCorp integration.
- Filter by a Vendor/Category - This field is already populated with the vendor associated with the integration. This was set up when the integration was created.
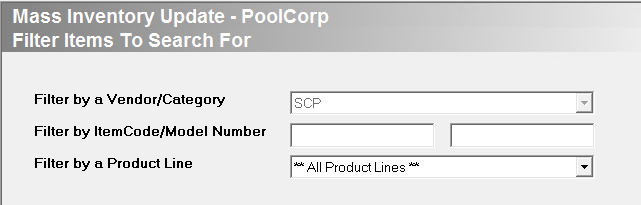
- (optional) Filter by Item Code/Model Number, Filter by a Product Line - These filters are optional, but we recommend that you select a specific product line to limit the number of results.
- Click Next. A confirmation message appears.

- Click Yes to confirm. This process can take several minutes, depending on the number of products that you included in your search.
- The progress of the update appears on the screen.
- The process is taking too long!: You can click the Stop Processing Now button to stop the process.
- A list of updated items appears once the process is complete.
- Not in the partner database (Red): An item appears in red if it was not found in the vendor's database. This means the vendor code or alias on the item is incorrect, Vendor codes are set up using the Vendors tab on the Item screen (Inventory > Open an item > Vendors tab > Select a vendor > Profile tab > Vendor Item Code field), and aliases are set up using the Alias tab on the Item screen (Inventory > Open an item > Alias tab).
- Item found, there is a cost difference (Blue): This means the item was found in the vendor's database, and the price is different. The current cost in your application appears in the Current Cost column, and the new cost appears in the New Cost column.
- What if the Percent Difference is unusually high?: We recommend confirming the cost with the vendor or verifying that the unit of measure in your database matches the unit of measure in the vendor's database. You can see the unit of measure in your database using the For ordering unit of measure field (Inventory > Open an item > Vendors tab > Open the vendor > Profile tab > For Ordering Unit of Measure field).
- Item found, not cost difference (Black): This means the item was found, but the price of the item has not changed.
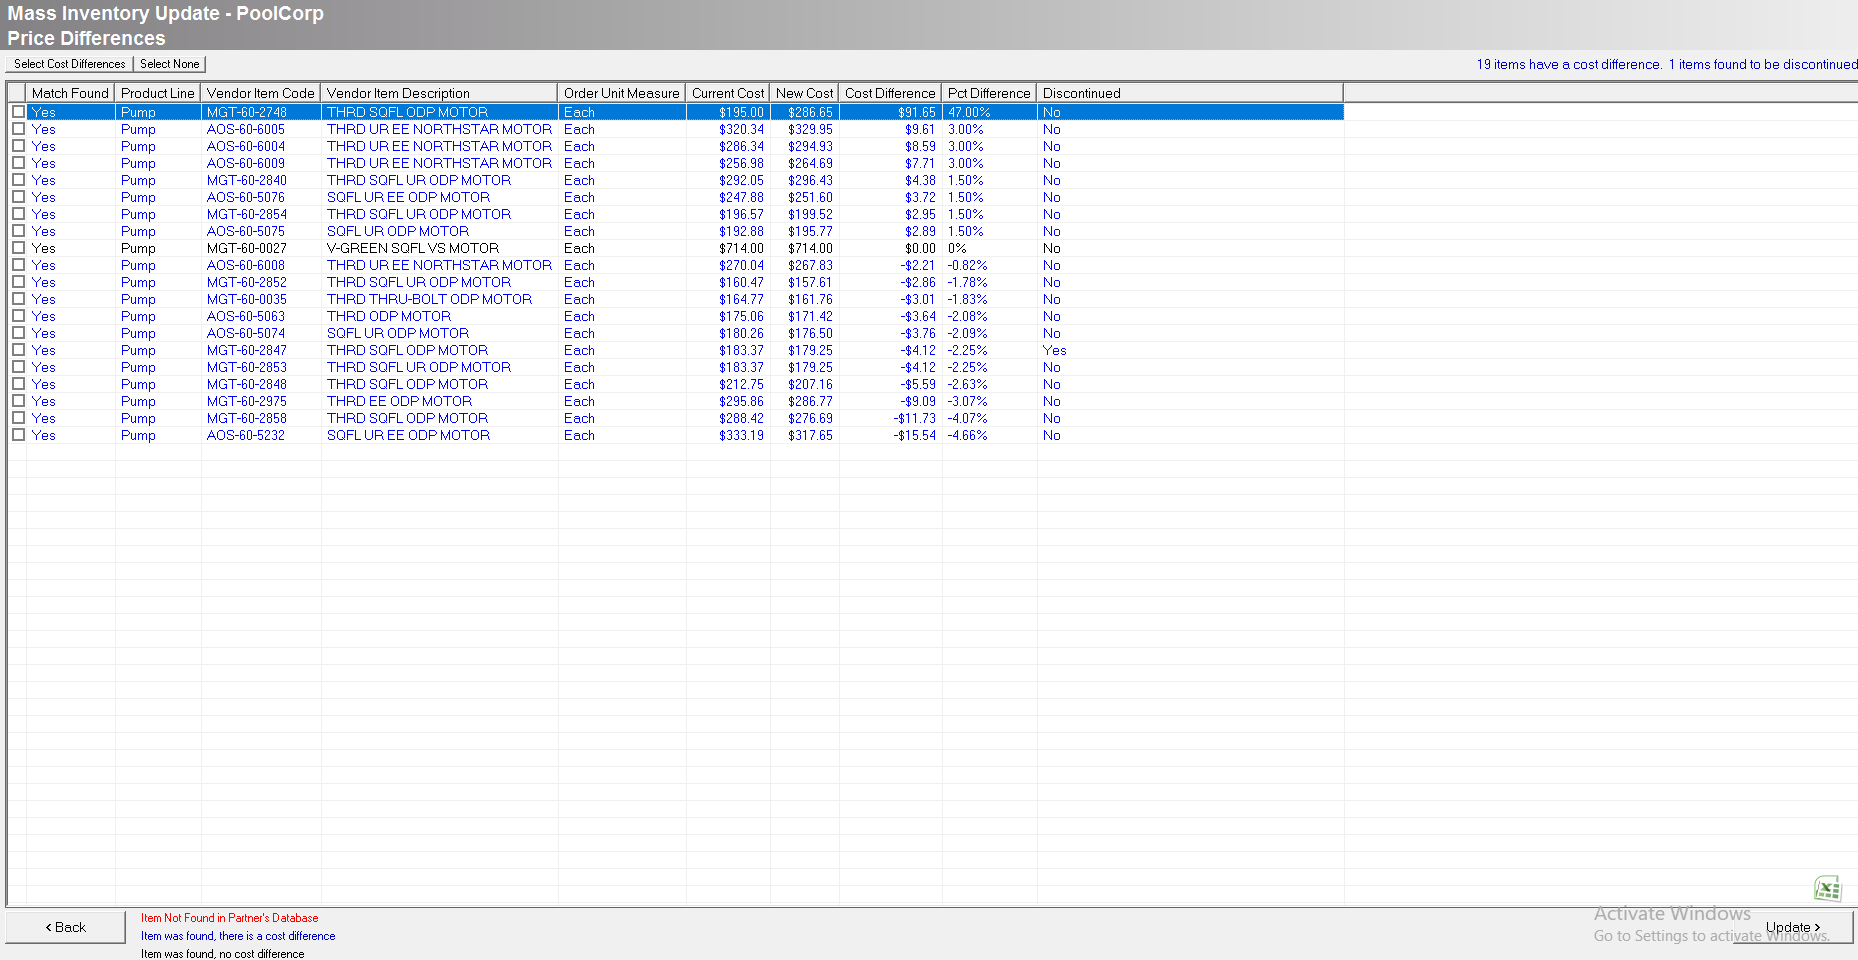
- Select the items to update.
- An item is not updated until you select an item and click Update.
- Click Select Cost Differences to select all items with a cost difference, and then uncheck the items you do not want to update.
- If you select a discontinued item, the application will mark it as Do Not Sell once inventory is depleted - Yes appears in the Discontinued column if the item has been discontinued by the vendor. If you select this item, the Is Clearance and Auto-Mark "Do Not Sell" when Inventory depleted boxes on the Options tab of the Item screen are checked (Inventory > Open an item > Options tab) This means the inventory item is marked as Do Not Sell once the inventory is depleted.
- We recommend exporting the information to Excel if you want to review how the cost change affects retail price and/or to determine if you want to adjust the retail price.
- Click Update.
- You may need to review the items to identify how the cost changes affect the retail prices and determine if adjustments are necessary.
- The retail price of any item using margin pricing is automatically updated based on the new price. Margin pricing is set up using the Pricing tab on the Item screen (Inventory > Open an item > Pricing tab).
- Click OK on the confirmation message that appears. *NOTE: The legend at the bottom of the screenshot indicates the status of item cost, whether that be not found, new price, or no change.

- The items have been updated.
Security Permissions Required

Related Video Content: